How to do a reef tank water change (step by step)
Ten to 15 percent of your total system volume, every week. That is the number most experienced reef keepers land on, and for good reason. Small, regular exchanges keep nitrate and phosphate from climbing while replacing the trace elements corals consume faster than testing can detect. Done carelessly, those same changes can stress every animal in the tank. Done well, they are one of the simplest tools you have for keeping a reef genuinely stable.
This guide walks through the complete procedure, including the two checks that matter most before a single drop goes back in, and the one mistake that trips up beginners with deep sand beds.
Why 10-15% weekly is the practical default
ATI North America, whose salt and supplement products are used in commercial and private reef systems worldwide, recommends changing 10-15% at a time for a typical reef, or 20-25% for heavily stocked tanks. That range was not picked at random. Smaller, more frequent changes smooth out chemistry rather than lurching it. A 30% swap sounds thorough, but if your new water's alkalinity is even slightly off from your tank's current level, you have just shifted the entire system - and corals feel alkalinity swings acutely.
Weekly is the frequency that works for most reef tanks. Bi-weekly is acceptable if your nutrient export is strong (a well-tuned skimmer, a refugium, low bioload), but stretching further than two weeks lets nitrate and phosphate creep in ways that become harder to correct without larger changes later. If you do fall behind, resist the urge to compensate with one massive exchange. Spread the correction over several consecutive days instead - sudden large swings in calcium, alkalinity, and salinity are harder on corals than elevated nutrients.
For an honest look at whether water changes are strictly necessary for every system, the article are water changes necessary covers the alternatives and their real trade-offs.
Preparing new saltwater: the match-before-add rule
This is where most beginner mistakes happen. Water that goes into your tank must match the tank's temperature and salinity before it touches the display. Not close enough - matched. A specific gravity difference of as little as 0.002 SG between new and tank water is enough to cause osmotic stress in corals; a temperature difference of more than a degree or two stresses fish and causes measurable tissue damage in corals. Research on the coral Acropora millepora found that even moderate salinity drops trigger a cascade of protein breakdown and oxidative stress at the cellular level. That process starts before you can see any visible sign of trouble.
Follow this sequence every time you mix new saltwater:
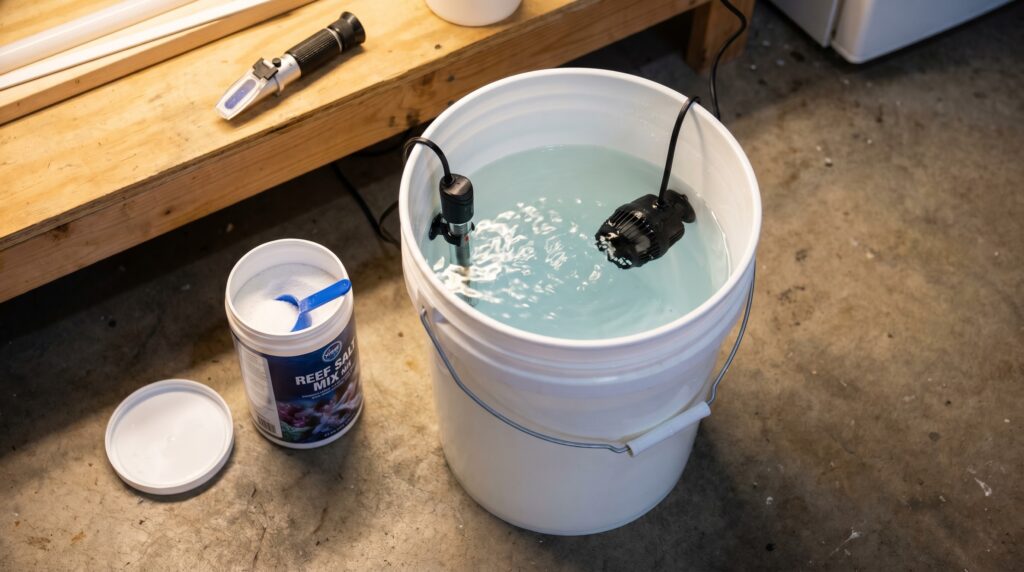
- Start with RODI water. Never tap water. Tap water contains chloramine, phosphate, silicate, and nitrate - all of them problems for a reef. The carbon block in a reverse-osmosis deionisation unit removes chlorine before water contacts the membrane; a dedicated chloramine-removal cartridge handles chloramines. Target 0 TDS out of the DI stage.
- Bring the RODI water to temperature first. ATI North America's guidance is explicit on this: heat the fresh RODI to match your tank's temperature before adding salt, because water temperature directly affects apparent salinity. Running a small aquarium heater in the mixing vessel is the easiest method.
- Add salt to the water, not water to salt. Adding water to a pile of undissolved salt creates calcium precipitation. Pour the salt slowly into the circulating water instead.
- Run a powerhead or pump in the mixing container. Mix for at least an hour minimum; most reef salt brands need several hours for full dissolution, and many reef keepers leave it running overnight. Twenty-four hours is the safest practice because it allows pH and dissolved oxygen to stabilise fully before the change.
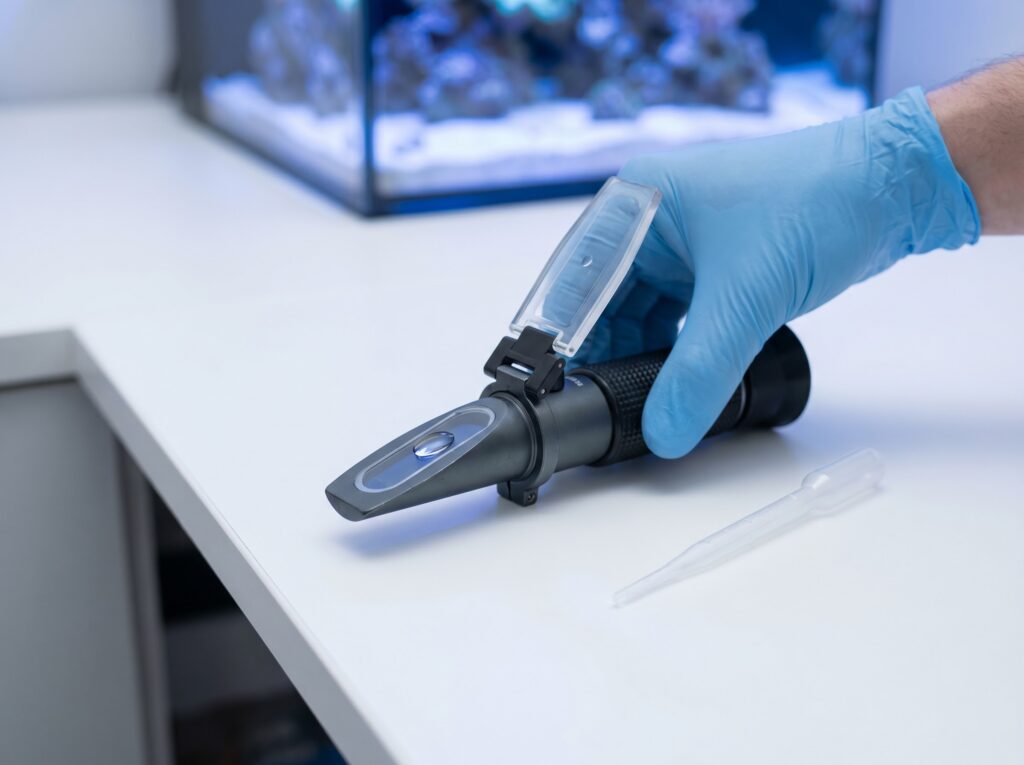
- Measure salinity with a seawater-calibrated refractometer. A standard brine-calibrated refractometer introduces up to 1.5 ppt of error on seawater, according to Red Sea's instrument specs. A seawater refractometer calibrated at 25°C reads absolute salinity directly. Target 1.025-1.026 SG (35 ppt), consistent with Tropic Marin's specified target range of 1.025-1.027 for reef systems.
- Match temperature once more, just before the change. The mixing vessel cools overnight. Check it again with a thermometer - ideally the same thermometer you use to read the tank, to eliminate calibration differences between instruments. Within one degree is the working target.
For a deeper guide on mixing saltwater from scratch, including salt brand differences and mixing ratios, see how to mix saltwater. For salinity troubleshooting in the display tank itself, reef tank salinity covers the full parameter picture.
The water change procedure, step by step
Your new water is ready and matched. Here is the full procedure in order.
| Step | Action | Key check |
|---|---|---|
| 1 | Turn off return pump, powerheads, and skimmer | Skimmer off prevents pulling air through a half-empty sump |
| 2 | Scrape glass/acrylic if needed, before siphoning | Do this first so loosened algae gets removed with the old water |
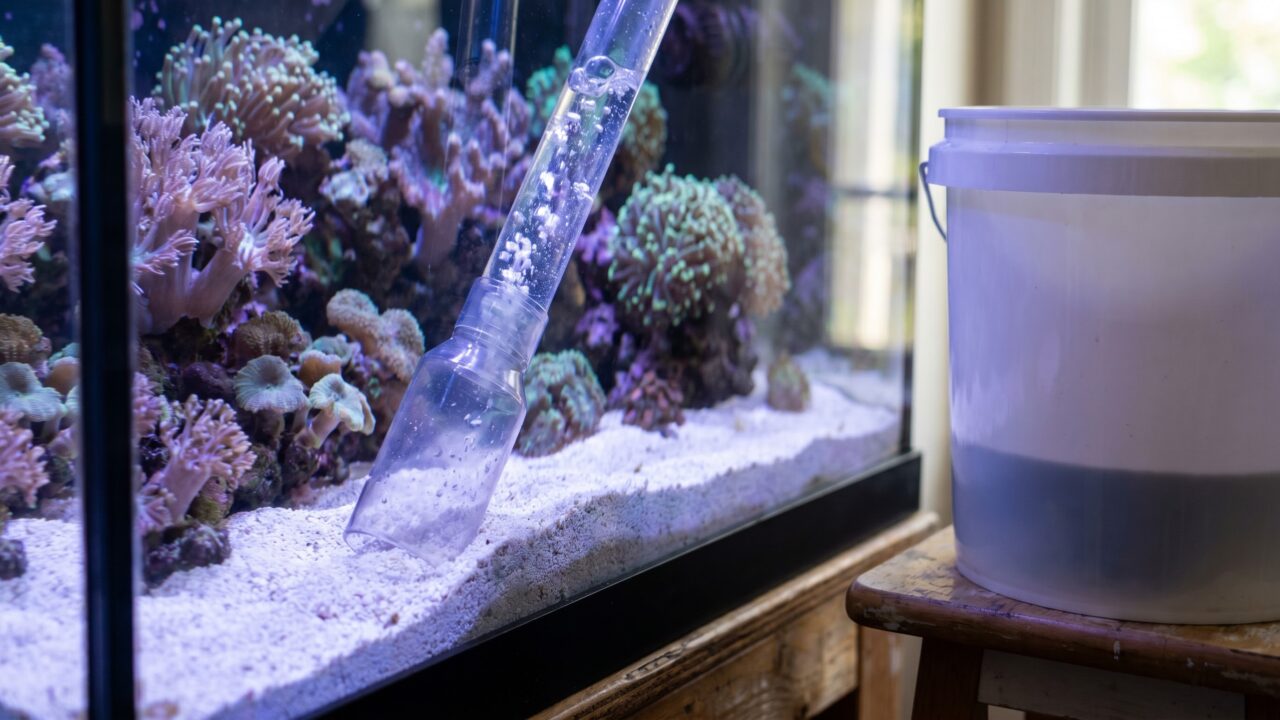
| 3 | Siphon old water into a dedicated waste bucket | Remove from the display or the sump - alternate between sessions |
| 4 | Work the siphon over the sand surface and rock bases | Surface detritus only - do not dig deep (see sand bed section below) |
| 5 | Confirm volume removed matches target (10-15% of system volume) | Include sump water in total volume calculation |
| 6 | Verify new water temperature (within 1°F of tank) and salinity (exact match) | This is the non-negotiable check before adding anything |
| 7 | Add new water slowly - pour over a rock or use a pump and tubing | No dumping directly onto the sand; that stirs the bed and spooks livestock |
| 8 | Restart equipment in order: return pump first, then powerheads, then skimmer | Give the skimmer 20-30 minutes to settle before adjusting |
| 9 | Confirm water level and spot-check salinity in the display | Evaporation since you last topped off may have pushed salinity up slightly |
The full ongoing maintenance picture - what to do weekly, monthly, and quarterly - is covered in the maintenance guide.
Siphoning detritus: what to move and what to leave alone
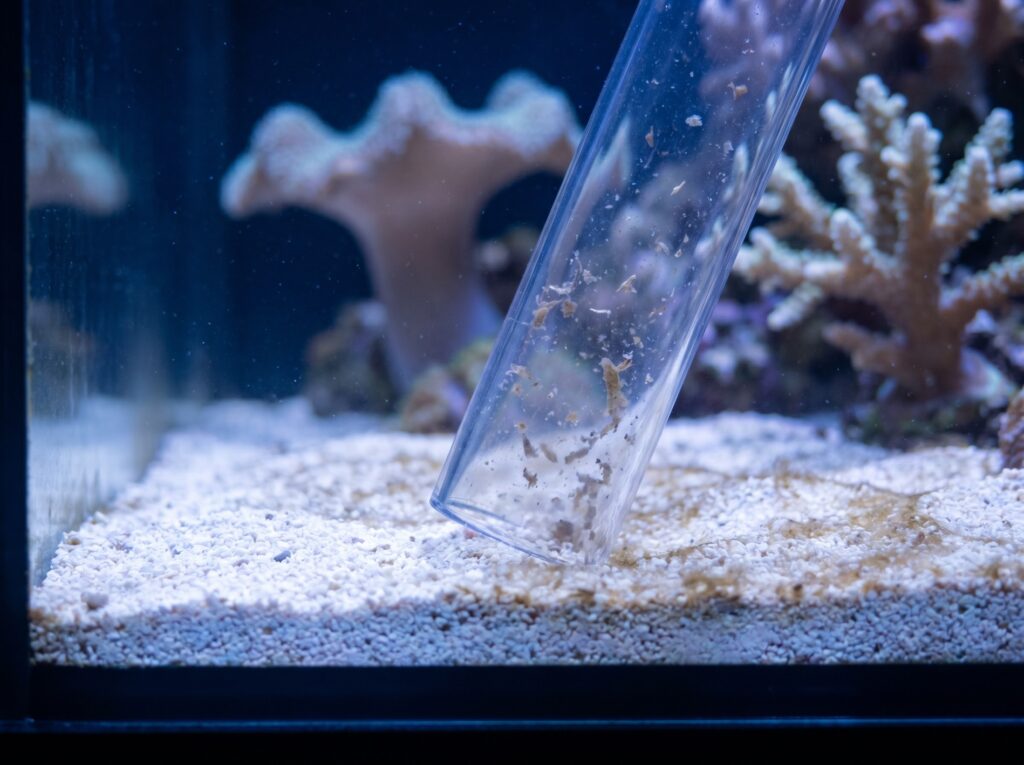
The siphon is your main detritus removal tool during a water change. Use it well. Work from the highest points of the tank downward - rocks, overhangs, and ledges first, then the sand surface. This way, anything you dislodge from rock work falls onto the sand and gets collected on the next pass rather than resettling.
On the sand, keep the siphon tube just above or barely touching the surface. You want to pull the fluffy brown or grey detritus sitting on top - fish waste, uneaten food, and settled particles - without excavating the sand itself. Regulate suction by pinching the hose if the vacuum is too strong; you should see detritus disappearing into the tube, not large clouds of sand.
There is no need to cover every square inch every week. Rotate through different zones - front corners one session, the back edge the next. Detritus that never moves becomes a long-term nutrient sink, but chasing every particle every week creates more disruption than benefit.
Why you do not vacuum a mature sand bed deeply
A sand bed that has been running for more than a few months is a biological filter, not just a decorative substrate. The surface layer hosts aerobic nitrifying bacteria that are doing useful work. Disrupting it repeatedly slows their function. Research on substrate effects in ornamental fish tanks found that the substrate microbial community directly shapes water quality - and that even routine water changes alter the diversity of that microbial load. Dig up the bed regularly and you reset that community each time.
On the question of deep anaerobic disturbance: the concern about hydrogen sulfide pockets is real enough to treat seriously, though contested scientifically. At least one year-long controlled test of 5-inch deep sand beds found no measurable hydrogen sulfide production. Whether or not gas pockets form, aggressive deep vacuuming still damages the established microbial community, resuspends detritus throughout the column, and provides no clear benefit. The practical guidance from professional aquaculture maintenance is consistent: lightly siphon the surface, leave the deep layers undisturbed.
Gear that matters: the bucket discipline rule
You need at minimum two buckets that are used for nothing else. One for old water out. One for new water in. Label them. Keep them separate.
Soap residue in an aquarium bucket is a serious problem. Even trace amounts can harm fish gills and strip the biological film from rock and substrate. New buckets should be rinsed repeatedly with tap water, then with dechlorinated water, before their first aquarium use. If a bucket ever contacts household cleaners or detergents, retire it from aquarium duty permanently. White vinegar is the safe cleaning agent for removing mineral deposits or salt creep from dedicated buckets.
Beyond buckets, the core gear list for weekly changes is short:
- A gravel/sand siphon with 1/2-inch tubing for adequate flow
- A submersible aquarium heater for the mixing vessel
- A powerhead or small pump for mixing and for transferring new water gently
- A seawater refractometer (ATC, calibrated for seawater at 25°C - not a swing-arm hydrometer)
- A thermometer - same one used for the tank, checked against the mixing vessel
- A dedicated towel for wiping up splashes and salt creep
Swing-arm hydrometers are the one piece of gear worth replacing if you still own one. They are prone to air bubble errors and calibration drift, and a 1.5 ppt salinity error - easily introduced by a poorly calibrated instrument - is enough to cause measurable osmotic stress in sensitive corals over repeated water changes.
Quick checks before and after every change
A water change is also the best time to run a brief visual inspection. Before draining, scan for anything unusual: a coral that has been closed for more than a day, a fish that is hiding or breathing fast, any unusual film on the water surface. Problems that surface during a change are often problems that were quietly developing beforehand.
After refilling, watch livestock for 15-20 minutes. Coral polyps should open within an hour of restored flow. Fish should resume normal swimming patterns. Rapid gill movement or a coral that stays retracted after equipment is back on can indicate the new water was not matched closely enough - temperature and salinity are the first two things to recheck.
If your tank has been running clean and you want to understand whether your specific system actually needs weekly changes or could do less, are water changes necessary addresses that question with more nuance than a single number can capture.
Frequently asked questions
How long should I mix new saltwater before a water change?
A minimum of one hour with a running powerhead is the practical floor, but most reef salt brands benefit from longer - several hours to overnight. Mixing for 24 hours is the safest approach because it allows dissolved oxygen levels to fully equilibrate and gives you time to confirm both temperature and salinity before the change. Never use freshly mixed water that has not been circulated.
Can I do a reef tank water change without turning off the pumps?
It is better to turn off the return pump and powerheads before siphoning. Running equipment during the drain phase risks running the return pump dry if sump levels drop, and strong flow makes siphoning the sand surface harder. The skimmer especially should go off before and for a short time after the refill - it will react to the new water chemistry and produce excessive foam otherwise. Restart in order: return pump, powerheads, then skimmer.
What if my new saltwater is slightly off in salinity?
If the new water reads higher or lower than the display tank, add small amounts of RODI water (to lower) or additional salt (to raise), circulate briefly, and retest before proceeding. Do not add the water if the difference is more than 0.002 SG. A 10-15% exchange with water that far off will shift the whole tank's salinity noticeably - and repeated small errors compound over time. Taking five extra minutes here is always worth it.
How do I calculate 10% of my reef tank system volume?
Measure your display tank volume using its physical dimensions (length x width x height in inches, divided by 231 for US gallons), then add the sump volume. A 75-gallon display with a 20-gallon sump has 95 gallons of total system volume, so 10% is about 9.5 gallons. Most tanks are underfilled slightly and sumps run below maximum, so measuring the actual water level rather than tank capacity gives a more accurate figure.