Reef tank equipment explained: what each piece does and who actually needs it
Setting up a reef tank means wading through a wall of gear, each item claiming to be essential. Some of it genuinely is. Some of it can wait months – or may never apply to your tank at all. This page walks through every major equipment category, explains what each piece actually does, and tells you honestly who needs it and when. A sizing matrix near the end lets you cross-reference tank size against tank type to decide what belongs on your shopping list.
Before diving into individual pieces, one principle worth internalizing: water stability beats chasing perfect numbers. Most equipment failures hurt reefs not through a single catastrophic event but through slow, creeping instability – a heater that swings 4°F overnight, salinity that drifts because nobody topped off for three days, or flow that stagnates behind a rock pile. The gear described below exists to hold things steady, and that framing shapes which pieces matter most for which systems.
Filtration: skimmer, sump, socks, and mechanical media

Filtration in a reef tank is not a single device – it is a layered system. Understanding what each layer does helps you build only what your tank actually needs.
Protein skimmer
A protein skimmer pulls dissolved organic compounds out of the water before they break down into nitrate and phosphate. It works through foam fractionation: a spinning needle-wheel or pinwheel injects air into a reaction chamber and shreds it into a dense cloud of fine bubbles. Dissolved organics – proteins, fatty acids, and similar surfactant-like molecules – have an affinity for air-water interfaces, so they cling to bubble surfaces and ride upward into a collection cup as concentrated dark skimmate. The finer the bubbles, the greater the combined surface area and the more efficient the removal.
Skimmers also pull out bacteria, phytoplankton, and trace metals including copper. One practical consequence: copper-based disease treatments must never be used in a reef tank – they kill invertebrates and corals and persist in live rock. If you treat fish with copper, do it in a separate quarantine tank, never in the display. For a full breakdown of sizing and skimmer selection, see our guide to protein skimmers explained.
Who needs it: Any reef with corals or a significant bioload. Fish-only nano tanks can sometimes skip it; a coral reef system almost always benefits. The larger and more coral-heavy the tank, the more indispensable the skimmer becomes.
Sizing rule: Most manufacturers rate skimmers by “gallons of aquarium they support.” Size up one bracket from your actual tank volume – a skimmer rated for 100 gallons on a 75-gallon reef gives you headroom as the bioload grows.
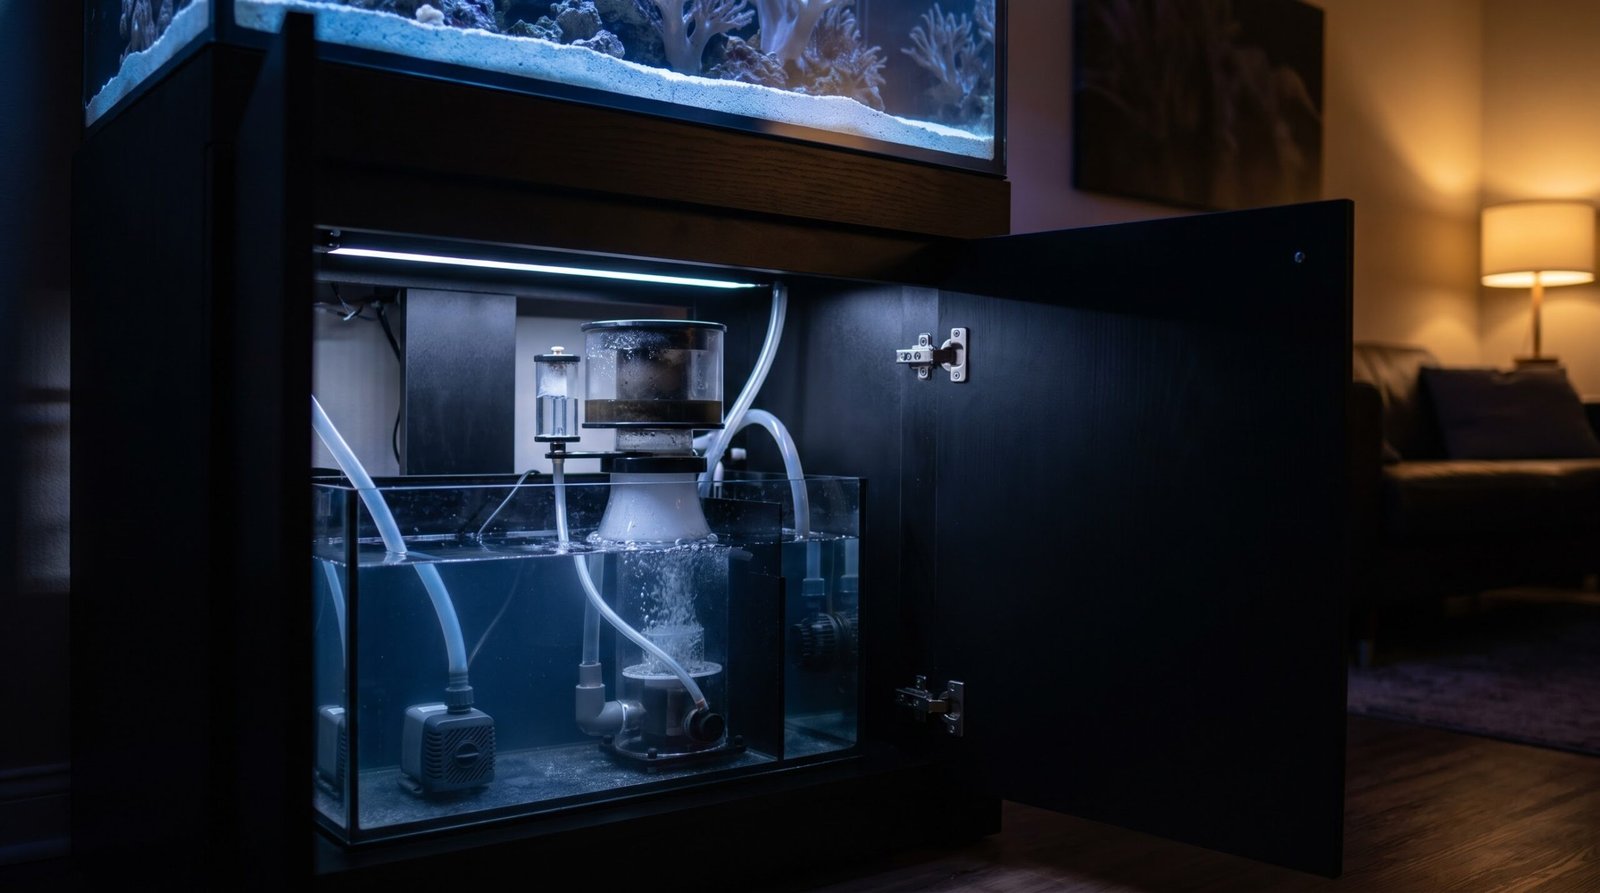
Sump
A sump is a secondary tank plumbed below the display tank. Water drains from the display through an overflow and weir, passes through the sump – where equipment like skimmers, heaters, and dosing lines live – and returns via a return pump. The sump does several things at once: it houses gear out of sight, it adds total water volume (which buffers parameter swings), and it gives biological filtration media and refugium macroalgae a place to live.
A refugium section filled with chaeto or other macroalgae under a dedicated light competes directly with nuisance algae for nitrate and phosphate, pulling nutrients out passively every time you harvest a handful of growth. It also produces copepods that drift back into the display and feed fish and corals. Even a modest refugium section makes a real difference on a moderately stocked reef.
For the full sump build walkthrough, see reef tank sump explained.
Who needs it: Sumps are standard practice on tanks 40 gallons and larger because the extra water volume alone is worth it. On smaller tanks and all-in-one units the sump is often replaced by a built-in rear filtration chamber – smaller, but the concept is the same.
Filter socks and mechanical media
Mechanical filtration captures solid particles – uneaten food, detritus, algae fragments – before they dissolve and add to the nutrient load. The most common options are filter socks, filter pads, and automated filter rollers, each fitted at the point where water enters the sump.
Filter socks need to be rinsed or swapped every three days. Leave one in longer and it becomes a nitrate factory rather than a nitrate preventer – trapped waste sits in water and leaches nutrients right back in. Filter rollers solve the maintenance burden by advancing a fresh strip of media automatically as the current strip clogs, extending cleaning intervals from days to weeks.
Who needs it: Any sump-equipped reef benefits from some mechanical pre-filtration. On a low-bioload nano without a sump, a fine sponge in the return chamber does the same job.
Water: RODI system and auto top-off (ATO)
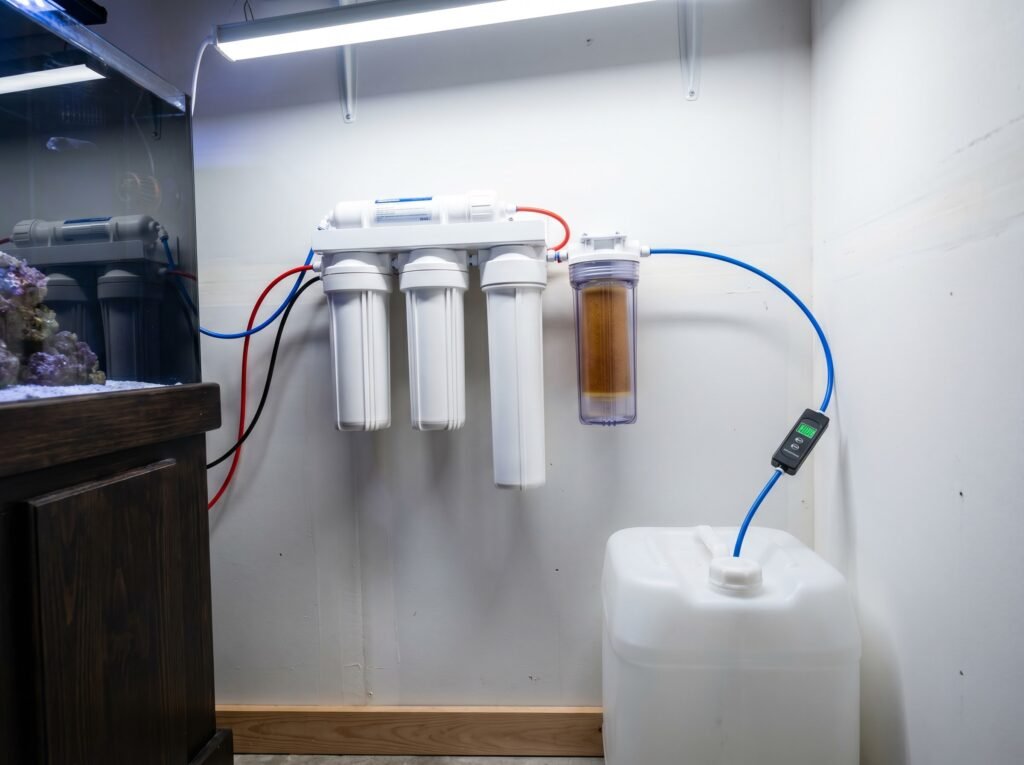
RODI system
Tap water carries chloramines, silicates, phosphates, nitrates, and dissolved solids that have no place in a reef. A reverse osmosis/deionization (RODI) system strips virtually all of them out. The RO membrane removes most contaminants, and the DI resin stage polishes the output to 0 TDS (total dissolved solids). Tap water commonly measures 150-400 TDS depending on local source water. A reverse osmosis stage alone typically brings it to 10-20 TDS, which is still too high for sensitive corals and SPS fragments; the DI stage is what closes the gap to 0.
Every batch of water going into a reef – top-off, water changes, salt mixing – should start from 0-TDS RODI. This is one of the few absolute rules in reef keeping. Tap water is the hidden cause behind many parameter mysteries that experienced hobbyists cannot otherwise explain.
For RODI unit selection and membrane maintenance, see RODI systems for reef tanks.
Who needs it: Every reef system, regardless of size. A 4-stage unit handles most home water supplies. Areas with very high chloramines may benefit from a 5-stage unit with a second carbon block.
Sizing rule: RODI units are rated in gallons per day (GPD) at standard pressure (typically 65 psi) and 77 degrees F; actual output drops with lower water pressure or colder inlet water. A 75 GPD unit produces about 3 gallons per hour under rated conditions – adequate for topping off and weekly water changes on most home reefs. Match GPD to your weekly water consumption with some margin.
Auto top-off (ATO)
Water evaporates from a reef constantly – faster under strong lighting or in a warm room, more still if you run cooling fans. Only pure water (H2O) evaporates; the dissolved salts stay behind. So the water level drops while salinity climbs. Left unchecked, a reef can drift from 1.025 to 1.028 or beyond within a few days, stressing both fish and corals.
An ATO places a water level sensor in the sump and connects it to a small pump sitting in a freshwater reservoir. When the level drops, the sensor fires the pump; when the level recovers, the pump stops. The system runs brief, frequent doses rather than one large manual top-off, which means salinity barely moves at all.
For a complete look at ATO types and installation, see auto top-off (ATO) systems.
Who needs it: Any reef where you cannot top off manually once or twice per day. In practice, that means almost everyone. A 30-gallon reef in a well-lit, open-top room can lose a quarter to half a gallon or more daily to evaporation depending on airflow, lighting heat, and humidity.
Climate: heater and chiller
Heater
The target temperature window for a reef is 76-78°F (about 24.4-25.6°C), with stability more important than hitting any specific degree. Peer-reviewed research on coral habitat requirements places the global tolerance range at approximately 21.7-29.6°C, but captive reefs perform best toward the cooler end of the comfortable range where dissolved oxygen stays higher. NOAA’s coral science confirms that corals expel their symbiotic algae (zooxanthellae) when water temperature spikes beyond their tolerance – the process called bleaching – and ATI North America’s aquarium guidance notes that swings of more than 1-2°F in a day can cause corals to brown out and go on stress alert.
Nearly every reef aquarium needs a heater. The standard sizing baseline is roughly 3-5 watts per gallon of system volume (tank plus sump). Running two smaller heaters instead of one large unit is common practice on larger tanks: if one heater fails open (stuck on), a single 500W heater will cook the tank, but two 200W heaters running in tandem create a natural backup where neither heater alone can push the tank past the target.
For heater brand comparisons and safety features, see reef tank heaters.
Who needs it: Every reef. No exceptions.
Chiller
High-output lighting, powerful return pumps, and enclosed equipment cabinets all add heat. In warm climates or during summer months, ambient room temperature alone can push a reef into the danger zone; ATI North America notes that zooxanthellae cannot survive temperatures above 84°F, and sustained temperatures in that range trigger coral bleaching. A chiller is a refrigeration unit through which aquarium water circulates, and it can drop tank temperature by several degrees reliably.
Not every reef needs a chiller. Cooling fans mounted over the sump increase evaporation and drop temperature by 2-3°F with minimal cost – a solution that works well in mild climates. An aquarium controller can also cut lighting intensity automatically if temperature rises, softening the load. Chillers become necessary when these passive measures cannot hold temperature under 82°F consistently.
Who needs it: Reefs in warm climates, tanks running very high-wattage lighting, or any system that cannot be adequately cooled passively. Nano tanks are especially vulnerable because a small water volume has little thermal mass to absorb heat.
Sizing rule: Chillers are rated in fractional horsepower (1/10 HP, 1/4 HP, 1/2 HP, and up). Manufacturer ratings for 1/4 HP units vary widely – from around 60 gallons on the low end to 200 gallons on the high end depending on brand and how much temperature drop is needed. Check the specific chiller’s capacity chart for your tank volume and desired delta-T. Size up if the tank is in an unconditioned space or needs to drop temperature more than 5-10 degrees.
Flow: wavemakers and return pump
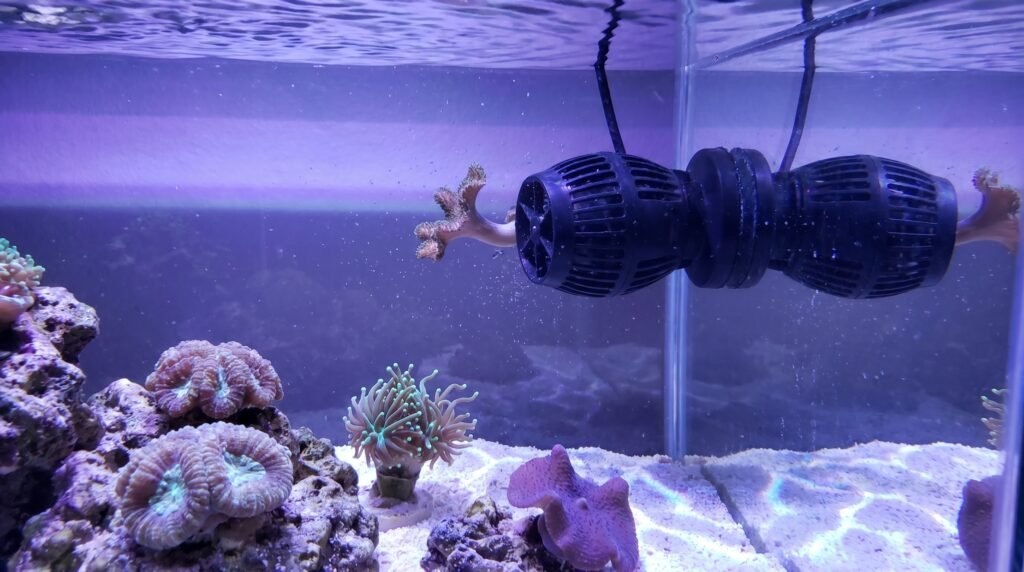
Wavemakers and powerheads
Corals are sessile – they cannot move toward food or away from waste. Flow does that work for them. Water movement delivers food particles and dissolved nutrients to coral polyps, carries away metabolic waste, and prevents detritus from settling in dead spots where it would fuel nitrate and phosphate. Research compiled from high-performing reef systems shows an average in-tank turnover of around 85 times the total tank volume per hour, with the best systems spanning 40x to 120x – far higher than most beginners expect. Inadequate flow produces thin, brittle coral growth and nutrient accumulation even in tanks where all the chemical parameters look correct.
Modern wavemakers use programmable surge, random turbulence, and alternating pulse modes to simulate natural reef surge rather than blasting a single steady stream. This turbulent, variable pattern reaches more of the rockwork and prevents corals from adapting to unidirectional flow (which causes them to grow in a skewed, one-sided shape over time).
For wavemaker types, placement strategies, and sizing charts, see wavemakers and powerheads.
Who needs it: Every reef. Even the smallest nano benefits from at least one small powerhead creating circulation beyond what the return pump provides.
Sizing rule: Target 20-30x turnover as a starting minimum from wavemakers alone; the return pump adds to the total. For a 50-gallon reef, that means 1,000-1,500 GPH from wavemakers. An EcoTech Marine VorTech MP10 (rated at 2,500 GPH maximum) covers most tanks under 50 gallons; the MP40 (5,000 GPH maximum) handles systems up to several hundred gallons.
Return pump
The return pump lives in the sump and pushes water back up to the display tank. It drives the circulation through the entire sump filtration loop: skimmer, refugium, mechanical media, heaters – all of it processes water only as fast as the return pump moves it. Return pumps are rated at zero head pressure (no resistance), but real-world output drops with every foot of vertical rise and every plumbing elbow. A pump labeled 1,200 GPH may deliver 750-850 GPH by the time water reaches the display tank four feet above the sump.
Sizing a return pump requires matching it to your overflow drain capacity. Oversizing is genuinely dangerous: too much flow backs up in the display and can overflow the tank or starve the sump dry. The safe approach is to identify the maximum rated GPH of your drain(s) and match the pump to that number at actual head pressure, not at zero-head spec. A 5-10x sump turnover per hour is a common target range for the return loop alone.
Who needs it: Every tank with a sump.
Sizing rule: Identify your overflow drain size. A single 1″ bulkhead drain handles about 600 GPH maximum. A single 1.5″ drain handles about 1,300 GPH. Choose a pump that delivers those figures at your actual head height, not at the advertised zero-head rating.
Dosing: two-part, kalkwasser, and calcium reactors
Corals build their skeletons from calcium and alkalinity (carbonate hardness). Every gram of coral growth depletes both from the water. A moderately stocked 100-gallon reef with active coral growth consumes roughly 20 ppm of calcium and 2.8 dKH of alkalinity per day. Over a month, that accumulates to 600 ppm of calcium and 84 dKH of alkalinity that must be replaced – otherwise levels crash, coral growth stops, and bleaching follows.
Small tanks with few corals can maintain calcium and alkalinity through regular water changes alone. Once coral density increases past a certain threshold, water changes cannot keep up and active dosing becomes necessary.
Two-part dosing
Two-part dosing uses two liquid solutions – one calcium-based, one alkalinity-based – dosed separately into high-flow areas. The two parts cannot be mixed before adding because calcium will precipitate out of solution; they must be added to the tank separately, never combined in the same dosing vessel. Dosing pumps automate this, delivering small precise volumes 12-24 times per day rather than one large daily dose, which keeps parameter swings minimal.
Two-part is the recommended starting method because you can test and adjust each element independently. A dosing pump costs $50-150 and the two-part solutions are widely available. It scales from nano tanks to systems consuming 3+ dKH per day.
Who needs it: Any reef with enough coral to noticeably consume calcium and alkalinity between water changes – typically once the tank has been running several months and coral coverage is growing.
Kalkwasser
Kalkwasser (calcium hydroxide dissolved in freshwater) doses calcium and alkalinity simultaneously and also raises pH. It is often delivered through the ATO reservoir, meaning evaporation top-off adds both freshwater and supplementation in one step. The drawback is solubility: kalkwasser has a saturation limit, and dosing too quickly causes a pH spike that stresses corals. It works well on lightly to moderately stocked reefs but cannot keep up with the daily demand of an SPS-heavy system.
Calcium reactors
A calcium reactor runs aquarium water through a chamber of calcium carbonate media (crushed coral skeleton) under a low pH maintained by CO2 injection. The acidic water dissolves the media, releasing calcium and alkalinity into the effluent that returns to the tank. Reactors are the high-capacity option for SPS-dominated systems consuming 10+ dKH of alkalinity per day – the load level where two-part dosing becomes expensive and unwieldy. The upfront cost is significant (reactor, CO2 tank, regulator, controller), and setup requires careful tuning. Most beginners don’t need a reactor for the first year or two.
For a full comparison of dosing methods and pump setup, see dosing pumps explained.
Monitoring: test kits, controllers, and probes
Gear keeps parameters in range; testing tells you whether it’s working. A reef with excellent equipment but no testing routine is flying blind. The parameters that matter most for a healthy reef are salinity, temperature, alkalinity, calcium, magnesium, nitrate, and phosphate. Practical targets: nitrate 1-10 ppm, phosphate 0.03-0.10 ppm. Zero on either is not the goal – corals need low but measurable nutrients; a tank stripped of both invites pest algae like dinoflagellates and starves the animals you are trying to grow.
Salinity
Measure with a quality refractometer with automatic temperature compensation (ATC), not a swing-needle hydrometer – hydrometers are notoriously inaccurate and prone to air bubble errors. Target specific gravity 1.025 (35 ppt); the accepted reef range runs 1.023-1.026. Calibrate the refractometer with a known-salinity reference solution before first use and periodically thereafter.
Alkalinity, calcium, and magnesium
These are the “big three” for coral growth and the most important to test regularly. In a reef with actively growing corals, alkalinity should be tested at minimum twice per week; calcium and magnesium weekly. Stability matters more than hitting exact numbers. An alkalinity of 9 dKH that holds steady is better for coral than one that bounces between 8 and 11 over a week.
Hanna Instruments colorimetric checkers (the HI772 for alkalinity in dKH, the HI758 for calcium) deliver digital accuracy by measuring light absorbance through the test sample rather than relying on color-matching by eye. The precision they provide over standard titration kits becomes meaningful once you are dosing and trying to detect small daily swings.
Aquarium controllers
An aquarium controller (such as a Neptune Apex or equivalent) connects probes for temperature, pH, and conductivity/salinity to a central hub that can control outlets, send alerts, and shut off equipment if a parameter goes out of range. A controller will cut your heater if temperature spikes and alert your phone at 2 a.m. when a pump fails. For tanks with significant equipment investment, the peace of mind is real.
Who needs it: Controllers are genuinely optional for simple nano setups where equipment failure is visible and correctable quickly. They become valuable on larger systems – especially overnight or when you travel – where an undetected heater failure or pump shutdown can wipe out a tank before you notice.
For the broader discussion of water parameters and what to do when they drift, see water parameters and reef tank temperature.
Equipment matrix: what you actually need by tank size and goal
The table below is a decision tool, not a rule book. Your actual needs depend on bioload, coral type, and climate – use it as a starting framework.
| Equipment | Nano reef (under 20 gal) | Mid-size reef (20-75 gal) | Large reef (75+ gal) | Fish-only / FOWLR | SPS-dominated reef |
|---|---|---|---|---|---|
| Protein skimmer | Optional (low bioload) | Strongly recommended | Essential | Helpful but optional | Essential |
| Sump | Optional (AIO works) | Recommended | Essential | Recommended | Essential |
| Filter sock / roller | Small sponge OK | Recommended | Recommended | Helpful | Recommended |
| RODI system | Essential | Essential | Essential | Essential | Essential |
| Auto top-off (ATO) | Very helpful | Strongly recommended | Essential | Very helpful | Essential |
| Heater | Essential | Essential | Essential (x2) | Essential | Essential (x2) |
| Chiller | Only if overheating | Only if overheating | Only if overheating | Only if overheating | Consider proactively |
| Wavemaker | Essential (small unit) | Essential | Essential (multiple) | Helpful | Essential (multiple) |
| Return pump | Only with sump | With sump | Essential | With sump | Essential |
| Dosing pump / two-part | Water changes usually enough | Once corals are established | Strongly recommended | Not needed | Essential |
| Calcium reactor | Not needed | Not needed | Optional (heavy SPS only) | Not needed | Consider at high demand |
| Aquarium controller | Optional | Optional (valuable) | Recommended | Optional | Strongly recommended |
| Hanna-type test kit | Recommended | Recommended | Essential | Basic kit OK | Essential |
For a curated shopping list broken down by tank size, see reef tank equipment list by size.
Putting it together: how the gear connects
Viewed as a system, the equipment above forms three interlocking loops. The water quality loop – RODI input, mechanical filtration, skimmer, sump refugium, and dosing – keeps the chemistry stable. The climate loop – heater, chiller, and ATO – keeps temperature and salinity stable. The flow loop – return pump and wavemakers – keeps water moving so every other piece of chemistry work can actually reach the coral.
When something goes wrong in a reef, the culprit usually lives in one of those three loops. A troubleshooting checklist for common problems is at troubleshooting. If you are still deciding what your first tank will be, getting started and reef tank setup checklist walk through the whole build sequence.
Frequently asked questions
Do I need all of this gear for a 20-gallon reef?
No. A 20-gallon reef needs a heater, RODI water, an ATO, some form of flow, and basic test kits as a minimum. A skimmer helps once you add fish or corals, but a well-maintained tank with regular water changes can get by without one early on. Add equipment as the bioload and coral density grow.
Can I skip the sump?
On a nano or all-in-one tank, yes – the built-in rear chamber handles the basics. On any tank 40 gallons and up, a proper sump adds enough water volume and equipment space that most experienced reefers consider it a practical necessity rather than optional. More water volume means slower parameter swings and more time to correct problems.
What is the most critical single piece of reef equipment?
RODI water is arguably the most foundational because it affects every batch of water in the system. Beyond that, stable temperature via a reliable heater causes the most damage when it fails. A heater that sticks on overnight can kill an entire reef before morning – which is why a controller with temperature alerts or dual-heater setups are common on tanks with real coral investment.
When should I start dosing calcium and alkalinity?
Start testing alkalinity and calcium as soon as you add corals. Dose only when tests show measurable decline between water changes. Many new reefs with light coral loads stay in range on water changes alone for months. The signal to start dosing is consistent decline, not a pre-set date or coral count.
The SteadyReef team
We write calm, plain-English reef-keeping guides. Every claim is checked against the marine-science and manufacturer sources listed above before publishing.