Auto top-off (ATO) systems explained: how they stop salinity swings in reef tanks
Every reef tank loses water to evaporation every single day. The salt stays behind. The specific gravity climbs. And unless you top up the tank with fresh water, that quiet drift will stress your corals and fish long before you notice it with a test kit. An auto top-off (ATO) system solves this by refilling the tank automatically - keeping salinity rock-steady with no daily intervention from you.
For most beginners, an ATO is the single highest-value stability upgrade they can add after their initial setup. It costs less than a mid-range powerhead, takes under an hour to install, and eliminates the most common cause of unexplained parameter swings.
Why evaporation raises salinity - and why that matters
The ocean runs on the same principle. NASA's ocean salinity research group states directly that "evaporation of ocean water...increase[s] the ocean's salinity," and NOAA echoes this: regions with the highest evaporation rates are consistently the saltiest. When water turns to vapor, the dissolved minerals stay in solution. In a closed reef tank, that concentration effect happens fast.
A typical 75-gallon open-top system can lose close to a gallon a day. On a warm summer week with a fan blowing across the sump, a small tank can lose 5 percent or more of its total water volume. Your target salinity is 1.025 SG (35 ppt). If you lose even two gallons without replacement, a 40-gallon tank can jump by 0.002 SG or more - enough to trigger a measurable stress response in sensitive corals.
That stress is real at the cellular level. Peer-reviewed research on Acropora millepora exposed to salinity shifts found "up-regulation of genes involved in the mitigation of macromolecular and oxidative damage" - the coral's molecular machinery going into emergency mode. ATI, one of the leading reef chemistry manufacturers, puts it plainly: "the more significant the salinity change...the more stress it will cause, eventually leading to death." Stability matters more than chasing a perfect number. A tank locked at 1.025 outperforms a tank that swings between 1.023 and 1.028 across a single week - the upper end of that swing is already above the safe ceiling of 1.026.
The fix is simple: replace evaporated water with pure freshwater only. Never use saltwater to top off evaporation - that would add salt to a tank that already has too much. ATI's official guidance is explicit: "Top off for evaporation with fresh RO-DI water only." For more on why RO-DI water matters here, the short version is that tap water introduces phosphates, silicates, and chloramines that will feed nuisance algae and harm corals. The ATO reservoir should always hold RO-DI water that tests at zero TDS (total dissolved solids - meaning no minerals or chemicals carried over from the tap).
How ATO sensors work: optical vs float
Every ATO system does the same job: it senses when the water level drops and runs a small pump until the level is restored. The difference between systems mostly comes down to how the sensor detects that level drop.
Optical sensors
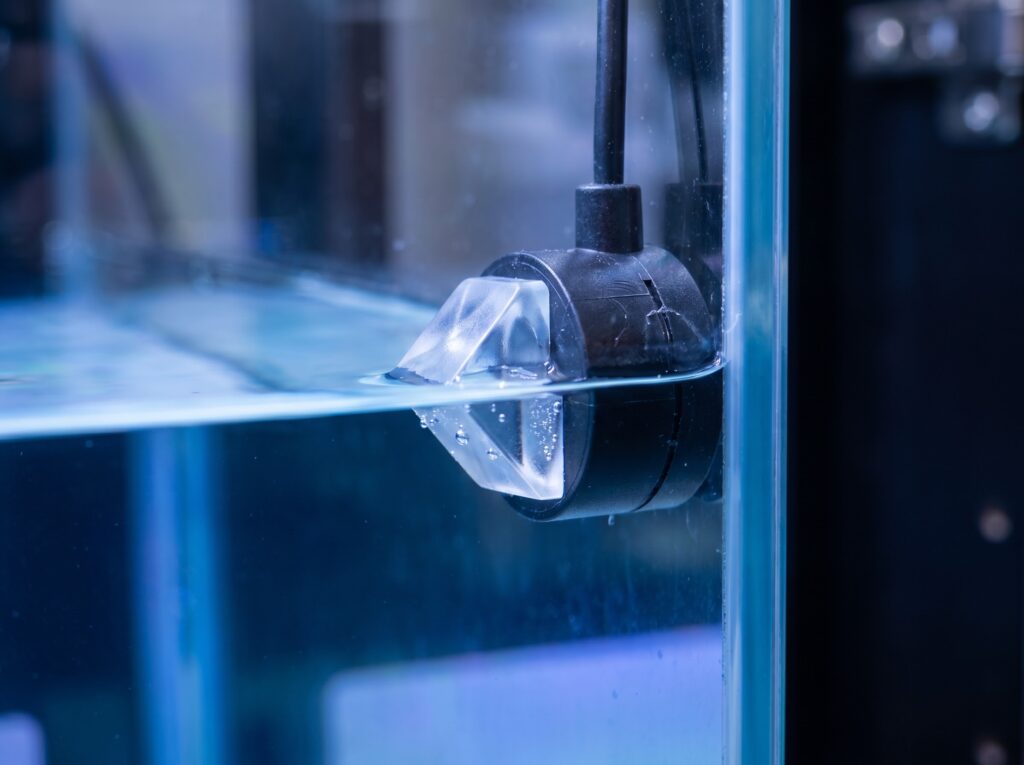
An optical sensor contains a small infrared LED pointed at a prism-shaped tip. Waterline Controls, an industrial sensor manufacturer, describes the mechanism: the LED fires down into the prism face and the light is "reflected up to an infrared receiver" when the tip is in air. When water covers the tip, the refractive index changes - the light bends out through the liquid instead of reflecting back, and the receiver signal drops to near zero. The controller reads that change as "water present" and shuts off the pump.
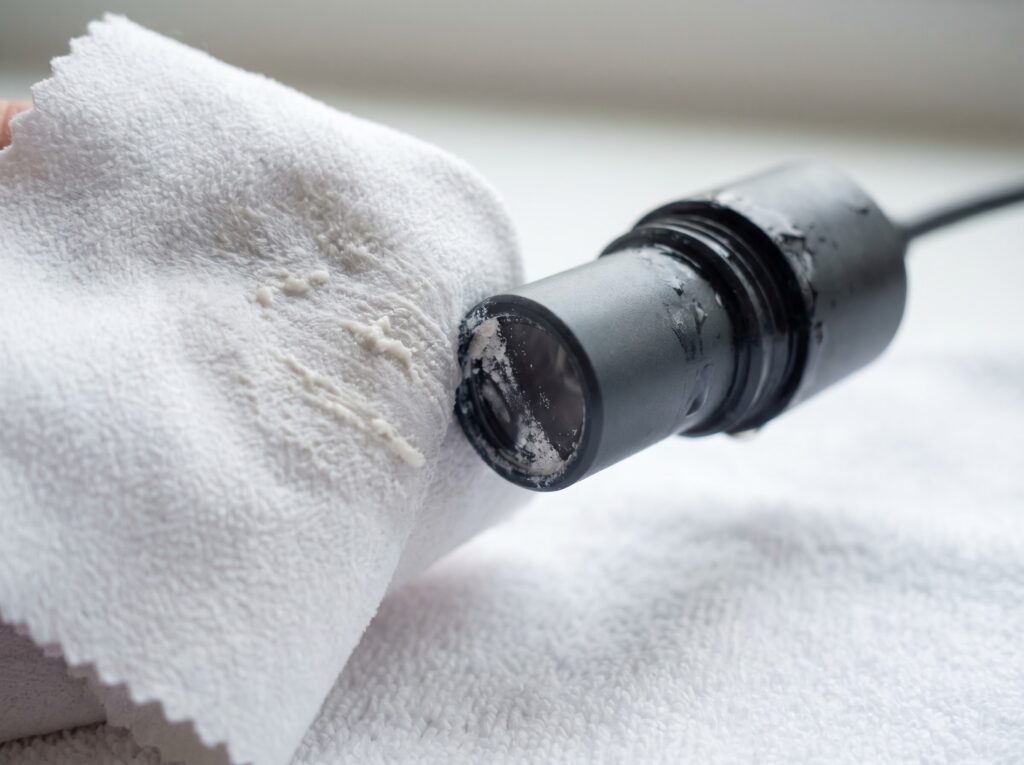
No moving parts. Detection to within 0.5 mm of a target level (per Tunze's Osmolator specification). Fast response. The main limitation optical sensors have is salt creep: if saline water evaporates on the sensor tip and leaves a mineral crust, the prism surface gets fouled and the sensor can give a false "wet" reading even in dry air. Simplicity Aquatics, an ATO manufacturer, calls cleaning salt creep "a crucial step to ensure proper operation." Wipe the tip monthly - that's the whole maintenance job.
Float switches
A float switch uses a sealed magnet inside a plastic float that rides the water surface. As the level drops, the float falls, and a reed switch inside the stem detects the magnet's position change, closing or opening the circuit to the pump. Mechanically simple and inexpensive. The weakness is that mechanical parts wear out - the float can stick, corrode, or get held in position by salt creep on the stem. Float switches are still common as secondary or backup devices rather than primary sensors in modern systems.
Which to choose
For a primary sensor, optical is the current standard in reef keeping. For a final hardware fail-safe, a mechanical float valve is still the preferred backstop - and the best commercial ATOs use both together.
The fail-safes you actually need
An ATO stuck in the "on" position will overflow a sump in hours. A failed sensor that never triggers the pump will let salinity creep upward for days. Both scenarios are real, and a well-designed ATO addresses each.
Neptune Systems' ATK (one of the most widely used systems in the hobby) illustrates the layered approach. The manufacturer describes "3 levels of redundant monitoring." First, a primary optical sensor at the target water level controls normal operation. Second, a backup optical sensor mounted slightly higher shuts the pump off and sounds an audible alarm if water rises past the primary sensor's position - protecting against a stuck-open pump or a sensor that failed to trigger the off signal. Third, a mechanical float valve acts as the final hardware backstop if both electronic sensors fail. On top of that, the ATK's "IQ-Fill" algorithm learns the typical volume added per top-off cycle and refuses to pump more than twice that volume before alarming - catching sensor failures that produce no obvious water-level signal.
The IceCap ATO uses a similar dual-optical design: "the second optical sensor provides real-time protection against failure of the first sensor." It also monitors the reservoir and "alerts you when your top off reservoir gets dangerously low to prevent the water pump from running dry" - protecting the pump from burning out on an empty container.
Tunze's Osmolator adds an independent thermal safety sensor that monitors the pump itself and stops it if it overheats from a dry-run condition, providing what Tunze describes as "100% overflow protection."
For a budget DIY setup using a single float switch and no backup, the risk of a stuck float causing an overflow or a missed reading is real. If you go that route, at minimum: set a timer limit so the pump can only run for 60-90 seconds per cycle, and keep the reservoir small enough that emptying it entirely cannot overflow the sump.
Reservoir sizing: how much water do you actually need?
The goal is a reservoir large enough to cover a week of evaporation without a refill, but small enough that a total failure cannot dump enough freshwater to dangerously crash salinity or overflow the sump.
Evaporation rate depends on four variables: water surface area, ambient temperature, air humidity, and airflow over the water surface. A lidded nano tank in a humid room evaporates far less than an open-top system under a fan running for cooling. The table below gives practical starting estimates. These are real-world ranges gathered from community reports; your actual rate will vary, so measure your own tank for a week before buying a reservoir.
| Tank size | Typical surface area | Estimated evaporation per week | Minimum reservoir size | Recommended reservoir size |
|---|---|---|---|---|
| 10-20 gallon nano (lidded) | ~1.5-2.5 sq ft | 0.5-1 gal/week | 1 gal | 2-3 gal |
| 20-40 gallon (open top) | ~2-4 sq ft | 1.5-3 gal/week | 3 gal | 5 gal |
| 40-75 gallon (open top) | ~4-6 sq ft | 3-6 gal/week | 5 gal | 7-10 gal |
| 75-120 gallon (open top) | ~6-10 sq ft | 5-10 gal/week | 7 gal | 10-15 gal |
| 120+ gallon (open top, fan-cooled) | 10+ sq ft | 8-14 gal/week | 10 gal | 15-20 gal |
How to calculate your own rate: measure the current salinity with a calibrated refractometer, then stop all top-off additions for exactly 24 hours and measure again. Every 0.001 SG rise across your tank's total water volume converts to a specific volume of water lost. For a 50-gallon system (roughly 189 liters), a rise of 0.001 SG indicates about 0.19 gallons evaporated. Multiply that daily figure by seven for your weekly reservoir minimum. Add 30 percent buffer and round up to the nearest available container size.
One important safety cap: keep your reservoir volume under 15-20 percent of your total system water volume. That way, even if the entire reservoir empties into the tank due to a stuck-open pump, the salinity drop stays within a manageable range - uncomfortable for inhabitants but survivable, not a wipeout. This is especially important on smaller tanks. A 5-gallon reservoir on a 20-gallon system is a recipe for disaster if the ATO malfunctions overnight.
Placement, installation, and common mistakes
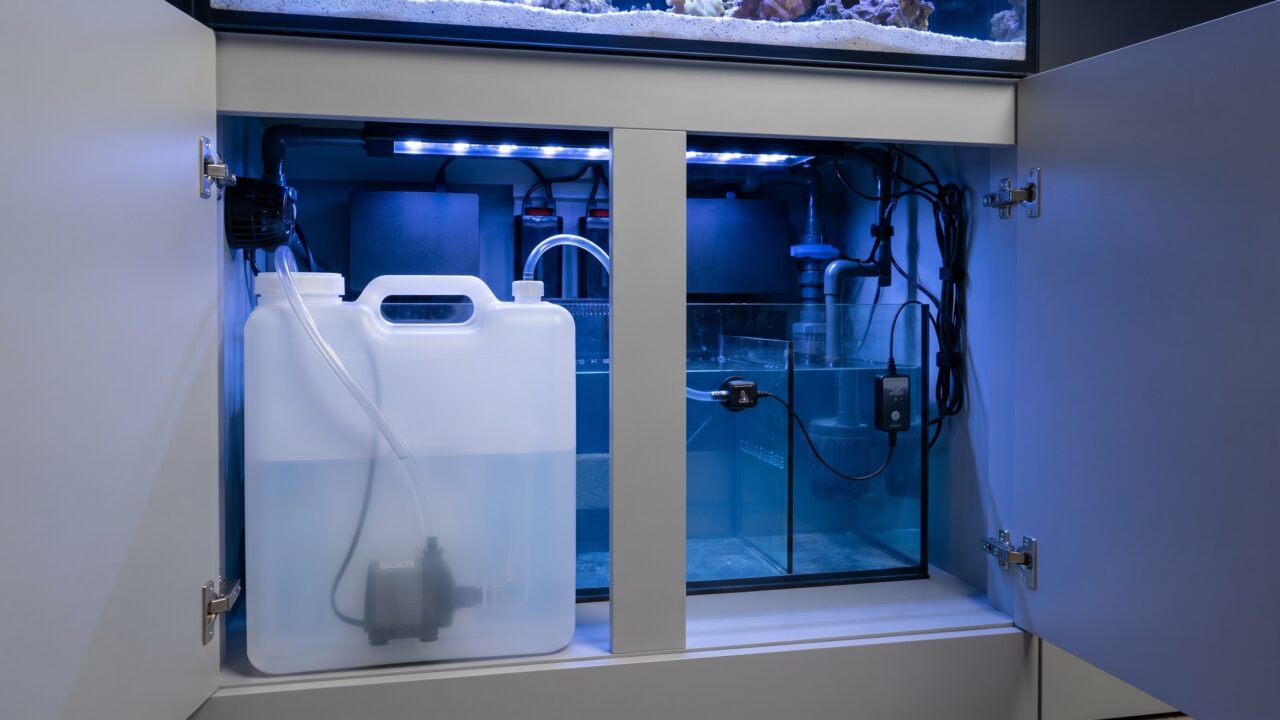
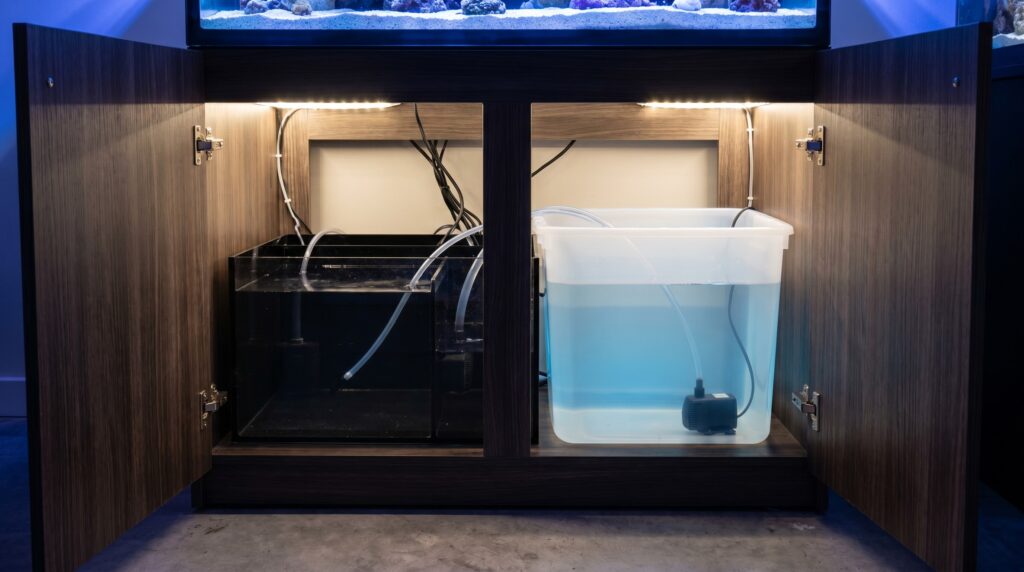
Most reef keepers place the ATO sensor in the sump rather than the display tank. The sump water level is a cleaner signal - no wave action, no powerhead turbulence, no corals bumping the sensor. Mount the sensor on the sump wall at your target operating level using the magnet holder that most systems include.
The reservoir can sit next to the stand or inside the cabinet. Keep it sealed or covered - an open container grows algae and collects dust, both of which will foul the pump intake over time. Label the container clearly so nothing other than RO-DI water (pure filtered water that tests at zero TDS - total dissolved solids) goes into it. Saltwater added by mistake is the most catastrophic single ATO error.
A few more failure points worth knowing:
- Siphon-back: if the ATO pump sits below the water level in the sump and the tubing runs downward from the reservoir, a pump failure can allow water to siphon back into the reservoir or onto the floor. A check valve on the output line, or a siphon break (a small hole drilled in the tubing just above the waterline), prevents this. Many commercial ATOs include one; verify yours does.
- Salt creep on the sensor: wipe the optical sensor tip with a damp cloth every two to four weeks. A sensor coated in dried salt mineral deposits reads "wet" when the tank is actually low - the pump never fires, and salinity creeps up silently.
- Reservoir runs empty: set a calendar reminder to refill the reservoir on a fixed schedule. Most modern ATOs alert you when the reservoir level drops low, but if yours doesn't, an empty reservoir means an unpowered pump running dry. Pump dry-run failure is the second most common way ATO systems fail, after sensor fouling.
If you notice your salinity climbing despite the ATO appearing to run normally, check the sensor tip first. If salinity is dropping unexpectedly, the pump may be running too often - either a stuck sensor, a very small sump with big wave action causing false low-level readings, or a genuine evaporation rate higher than expected (common when a heating system runs overtime in winter). See the routine maintenance guide for a full periodic check schedule.
For a broader look at reef equipment priorities and how an ATO fits alongside your skimmer, return pump, and dosing setup, the equipment overview covers how these systems interact. And if you are dealing with salinity that is already too high from a missed top-off period, the guide to lowering salinity safely walks through the correct correction process - slow dilution over 24-48 hours, not a sudden water swap.
Frequently asked questions
Can I use an ATO on a tank without a sump?
Yes. Place the sensor in the display tank itself, away from powerheads and wave makers that cause surface turbulence. Some hobbyists mount the sensor in a small acrylic tube (a "stilling well") to isolate it from water movement. The principle is identical; the challenge is finding a stable, undisturbed spot in the display tank for a reliable reading.
How often do I need to refill the ATO reservoir?
That depends entirely on your tank's evaporation rate. A small lidded nano might need a top-up once a week; a large open-top system with a fan for cooling can empty a 5-gallon jug in three to four days. Measure your evaporation rate over a 24-hour period (see the calculation method above) and size the reservoir accordingly. Most experienced reef keepers target a refill interval of five to seven days.
Does an ATO replace water changes?
No. An ATO only replaces evaporated freshwater to maintain volume and salinity. It does not remove nitrates, replenish calcium and alkalinity consumed by corals, or address accumulated organic waste. Regular water changes remain necessary. Think of the ATO as the tool that keeps salinity stable between changes, not a substitute for them.
What happens if the ATO pump fails in the "on" position?
This is the primary risk scenario. A pump stuck on will continuously add fresh water, crashing salinity and potentially overflowing the sump. This is why dual sensors, mechanical float backstops, and run-time limiters matter. If your ATO uses only a single sensor with no secondary protection, consider upgrading or adding a timer that caps the maximum pump run time per cycle to 60-90 seconds.
My ATO keeps running but the level never rises - what's wrong?
Check for a siphon: the pump may be sending water to the sump and then siphoning it back when it stops. Check that the reservoir actually has water in it. Check that the tubing is fully connected and not kinked. If all of those are fine, the pump itself may have failed - most ATO pumps are inexpensive to replace.