40-gallon breeder reef tank build: the sweet-spot reef
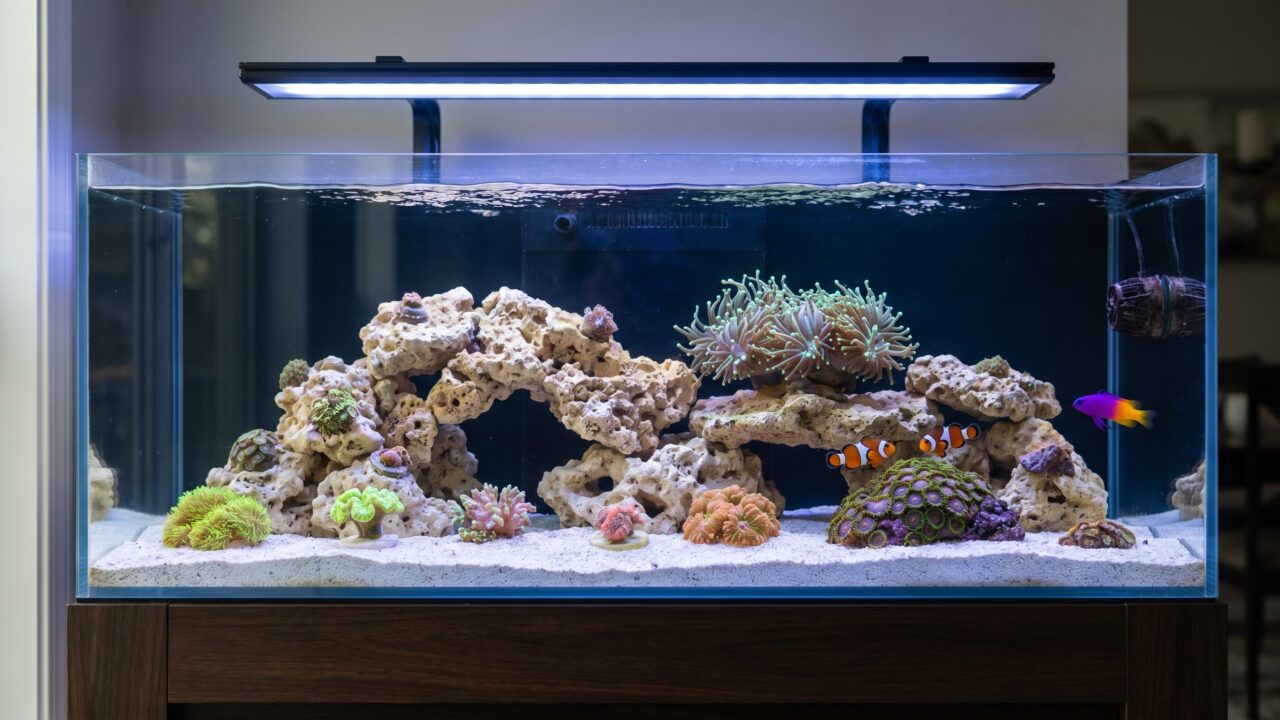
Thirty-six inches wide and 18 inches deep. Those two numbers explain why the 40-gallon breeder, called the "40B" by almost everyone who keeps one, has become the most discussed intermediate reef tank in the hobby. The footprint is shallow enough that a single LED fixture lights it edge to edge without fighting shadows, wide enough to build a real aquascape with swim-through arches and distinct zones, and holds just enough water - around 40 net gallons with sand and rock - to ride out a missed water change or a hot afternoon without cratering your parameters. It sits in a comfortable space between a 20-gallon build's tight margins and the cost of running something truly large.
This guide covers everything you need to set one up: why the footprint works so well for reef keeping, which of three filtration paths fits your situation, a complete gear list with realistic prices, a stocking plan built around the tank's actual limits, and a build sheet you can print and take shopping.
Why the 36x18 footprint earns its reputation
The standard 40-breeder measures 36.25 x 18.25 x 17 inches when you buy an Aqueon or Marineland model off the shelf. That 16-17 inch water depth is the number that matters most for reef lighting. Shallow water means your fixture delivers its PAR target at the sand bed without needing to crank intensity high, which reduces the bleaching risk when you are still learning to position corals. Soft corals do best in the 100-200 PAR range, LPS in the 150-250 range; SPS starts at 300 and climbs from there. With a quality LED at the right mounting height above a 16-inch water column, you can hit those targets across the whole tank rather than just a bright center spot.
The 18-inch front-to-back measurement gives you real aquascaping room. You can build a rock formation in the back third, leave a sandy open front for fish to cruise and for bottom-dwelling corals, and still have a clear visual line from every angle. Tanks that are only 12 inches deep force everything into one compressed plane. The extra 6 inches here is not trivial - it changes what the tank looks like when it is full and thriving.
Volume stability is the quieter benefit. A 20-gallon reef is genuinely unforgiving; evaporation of a single gallon swings salinity by 5%, and a faulty heater can overheat the tank in hours. At 40-plus gallons of total system volume (more once you add a sump), those same events produce smaller deviations. You have time to notice a problem and correct it before the corals register the stress. That buffer is what separates a 40B beginner from a stressed one.
Finally, the side and rear panels are ¼-inch standard (non-tempered) glass - which means you can drill the rear panel for a bulkhead if you want to plumb a sump. The bottom panel on some Aqueon 40B models is tempered and cannot be drilled, but the sides are safe. Not every tank at this size is drillable. The 40B is, and that matters if you want to run the most capable filtration path.
Three filtration paths for a 40-gallon breeder
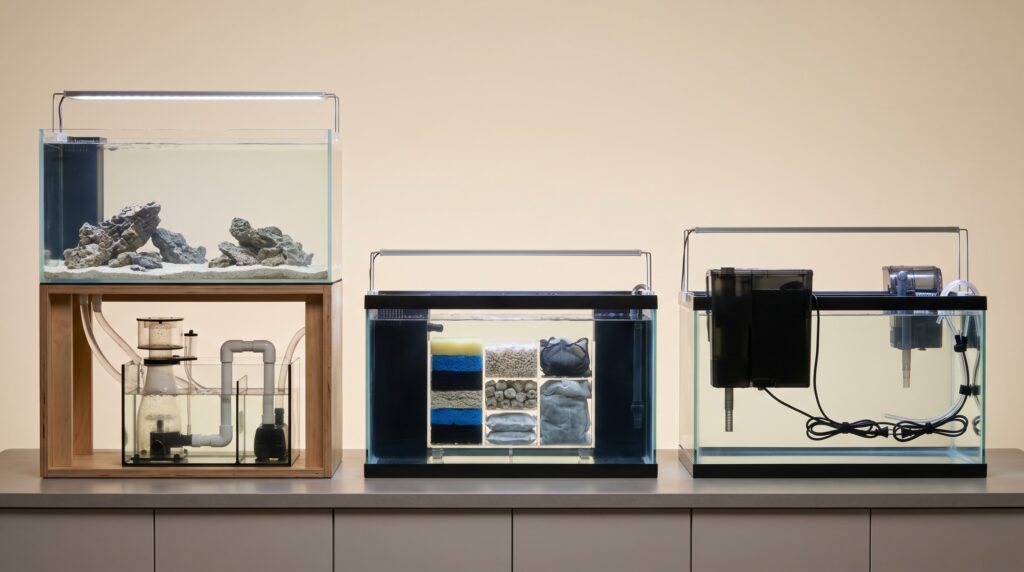
The 40B ships as a bare glass box. How you filter it shapes everything: how you build the stand, how much you spend, how easy maintenance is, and how far you can push the tank later. Below are the three realistic options, with honest trade-offs for each.
Path A: drilled sump
Drill the rear panel near the top, install an overflow box or a Coast-to-Coast overflow weir, run PVC to a sump (typically a 20-long or a purpose-built 30-gallon sump in the stand below), and plumb a return pump back to the display. This is the approach that experienced reef keepers almost universally prefer for tanks this size and larger, and the reason is not complexity for its own sake - it is that a sump adds 20-30 gallons of total system volume, hides all the ugly equipment out of view, and gives you a dedicated skimmer chamber, a refugium section, and room for a reactor or dosing reservoir as the tank matures.
The downside is the upfront learning curve: drilling glass, setting a silicone bulkhead, sizing the return pump, and balancing drain flow so the sump does not overflow or run dry. None of these steps is particularly difficult, but each one needs to be done once correctly. For the full mechanics of why a sump works and how to size one, our sump guide covers the details.
Return pump sizing for a 40B sump: aim to turn the display volume through the sump 3-5 times per hour. With a 40-gallon display and roughly 25-gallon sump you have 65 total gallons; a target of 4x turnover works out to 260 GPH at the return nozzle. Account for head pressure loss (roughly 75-100 GPH per foot of vertical lift) and size up accordingly. A pump rated 400-500 GPH at zero head, adjusted for your actual plumbing height, lands you close to that target.
Path B: AIO conversion kit
Several manufacturers sell rear-chamber conversion kits designed for standard glass tanks. A divider panel creates a back compartment with overflow slots; you fill the compartment with filter socks or floss, a small skimmer, and a return pump. The result looks and functions like a factory AIO - no drilling, no under-stand sump, no plumbing. FijiCube and similar brands make 40B-specific kits that attach with silicone or clips.
The trade-off is chamber size. A rear conversion on a 40B gives you roughly 6-8 inches of depth behind the divider, which is enough for a small skimmer and filter media but not a full refugium. You also sacrifice a strip of display viewing width. For a reef that will stay as a beginner mixed reef - soft corals, a few LPS, light fish load - this is a genuine option that avoids the drilling step entirely. For anyone who wants to push into SPS or add a large frag section later, the sump path will serve better.
Path C: hang-on equipment only
Hang-on-back filter, hang-on skimmer, hang-on refugium. No drilling, no sump, no conversion kit. This is the lowest barrier to entry and it works - thousands of successful reef tanks have run on hang-on equipment for years. The limitations are noise (HOB filters and many HOB skimmers are louder than sump-based alternatives), reduced sump volume benefit, and less flexibility as the tank grows. For a tightly budgeted first build or a situation where a stand with sump space is not possible, it is a workable starting point. The equipment list by tank size covers specific hang-on product categories in more detail.
The complete 40B build sheet
The table below is the decision tool this guide is built around. Use it as your shopping list, your budget planner, and your configuration tracker. Swap columns A/B/C to match the filtration path you chose above. Prices are 2026 US market mid-range estimates; budget and premium options exist at both ends.
| Component | Path A (sump) | Path B (AIO kit) | Path C (hang-on) | Notes |
|---|---|---|---|---|
| Display tank (40B) | $120-$160 | $120-$160 | $120-$160 | Aqueon or Marineland; check for $1-per-gallon sales |
| Stand | $120-$300 | $80-$200 | $80-$200 | Sump path needs an enclosed stand with interior space |
| Sump / AIO kit / HOB filter | $80-$200 (20L sump) | $80-$150 (kit) | $40-$80 (HOB) | Path A: Trigger or Reef Octopus 20-30 gal sump |
| Return pump | $80-$200 | included in kit | n/a | Target 400-500 GPH rated; DC variable-speed models easiest to tune |
| Protein skimmer | $150-$350 (in-sump) | $100-$200 (compact) | $100-$200 (HOB) | Size for 60-80 gal system, not just 40; oversized skims cleaner |
| LED light | $250-$500 | $250-$500 | $250-$500 | EcoTech XR30 G6, AI Hydra 32, or Kessil A360 cover 36" well |
| Wavemaker x2 | $60-$150 | $60-$150 | $60-$150 | Two smaller units beat one large one for even random flow |
| Heater (150W) | $40-$80 | $40-$80 | $40-$80 | Aqueon Pro 150W rated to 55 gal; add a controller for safety |
| Heater controller | $30-$60 | $30-$60 | $30-$60 | Inkbird ITC-306 or Ranco; prevents overheating if thermostat sticks |
| RODI unit (75 GPD) | $80-$180 | $80-$180 | $80-$180 | Must reach 0 TDS before use; tap water 150-400 TDS is unusable |
| Refractometer | $20-$40 | $20-$40 | $20-$40 | Swing-needle hydrometers are inaccurate; refractometer only |
| Test kit (API or Salifert) | $60-$120 | $60-$120 | $60-$120 | Minimum: ammonia, nitrite, nitrate, alkalinity, calcium, pH |
| Live rock (35-50 lbs) | $100-$350 | $100-$350 | $100-$350 | Dry rock seeds with live rubble; avoids hitchhiker pests |
| Aragonite sand (40 lbs, ~2 in) | $40-$70 | $40-$70 | $40-$70 | CaribSea Special Grade or similar; fine grain, not crushed coral |
| Salt mix (50-gal bucket) | $30-$60 | $30-$60 | $30-$60 | Red Sea Coral Pro or Tropic Marin Pro Reef both dissolve cleanly |
| Build subtotal (mid-range) | ~$1,500-$2,000 | ~$1,200-$1,700 | ~$1,100-$1,500 | Before livestock and corals |
| Livestock budget (starter) | $200-$500 | $200-$500 | $200-$500 | 2-3 fish, 4-6 coral frags, cleanup crew |
A note on the light spec: the EcoTech Radion XR30 G6 runs at 215W and delivers even PAR across almost a 4-foot spread with its 126.3-degree beam angle. That coverage matches the 36-inch 40B footprint closely. You do not need to buy the G6 Pro specifically - the G6 Blue handles soft corals and most LPS beautifully at lower cost - but the XR30 footprint is close to purpose-built for this tank.
Water parameters and why stability wins
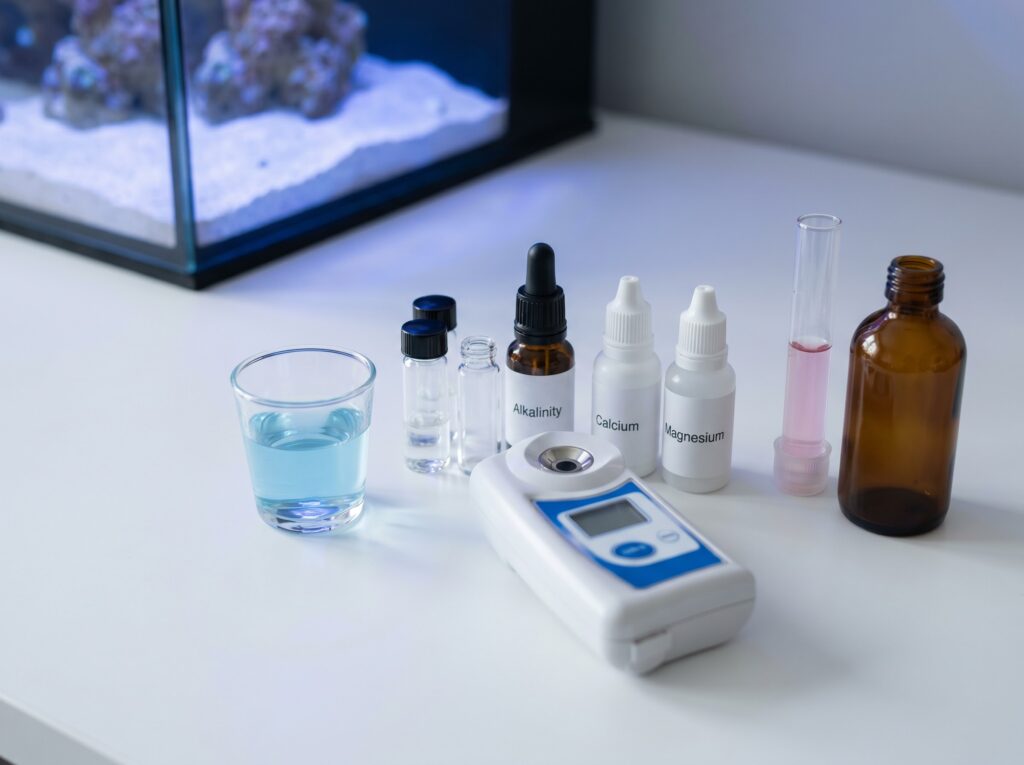
Corals do not care if your alkalinity sits at 8.5 dKH or at 10 dKH. They care whether it was 8.5 yesterday and 8.5 today. That distinction - stability over chasing a target number - is the single most important concept for a new reef keeper to internalize, and it applies to every parameter in the list below.
| Parameter | Target range | Notes |
|---|---|---|
| Salinity | 1.025-1.026 SG / 35 ppt | Measure with a refractometer; swing-needle hydrometers drift badly. Natural seawater is 1.026; 1.024 is the accepted lower bound for corals (below 1.023 SG injures corals). |
| Temperature | 76-78°F | Stable is the priority. A sticking heater without a controller can spike to lethal levels in hours. |
| Alkalinity (KH) | 8-11 dKH | Test twice a week while a new tank finds its consumption rate. Do not swing more than 0.5 dKH per day. |
| Calcium | 400-450 ppm | Pairs with alkalinity - if one drifts, the other follows. Keep them balanced. |
| Magnesium | 1250-1350 ppm | Low magnesium makes it almost impossible to hold stable calcium and alk. Test monthly once stable. |
| pH | 7.8-8.4 (daily swing normal) | A nightly dip to 7.9-8.0 and a daytime rise to 8.2-8.3 is normal and harmless. Sustained readings below 7.8 or above 8.5 are the warning zone. |
| Nitrate | 1-10 ppm for SPS; 5-20 ppm for LPS | Zero is not the goal. Nutrient-stripped tanks bleach corals and can trigger algae problems. Keep some. LPS corals are more tolerant of higher nitrate than SPS. |
| Phosphate | 0.03-0.10 ppm | Same logic as nitrate. Trace nutrients feed zooxanthellae. Zero-phosphate tanks look clean and grow slowly. |
Use only RODI water for mixing saltwater and for top-offs. Tap water contains chlorine, chloramines, phosphates, and silicates that a reef cannot process harmlessly. A 75 GPD RODI unit produces roughly 75 gallons per day - enough for a 40B's weekly water changes and top-off with water to spare. The output must test at 0 TDS before you use it; anything above that means a membrane or DI resin needs replacing.
Cycling and the ugly stage
Before livestock, before corals, you cycle. The nitrogen cycle is the biological engine that converts toxic fish waste (ammonia) first to nitrite, then to the far less dangerous nitrate. The bacteria responsible - Nitrosomonas for the ammonia-to-nitrite step and Nitrospira for nitrite-to-nitrate - colonize every porous surface in your tank: the rock, the sand, the sump baffles. Give them time. A standard fishless cycle using pure ammonia or a commercial bacteria starter runs 4-6 weeks from the first ammonia dose to the point where ammonia and nitrite both read zero simultaneously. Bottled bacteria products (Fritz TurboStart, Dr. Tim's One and Only) can compress that to 1-2 weeks if you follow the dosing instructions exactly.
During and just after cycling, the tank goes through what the hobby calls the ugly stage: a predictable sequence of diatom blooms (rust-brown film on everything), then green algae, sometimes a patch of cyano. This is normal. Do not panic, do not scrub it all away, and do not add livestock early to "fix" it. The bacteria and algae populations sort themselves out as nutrients stabilize. Most tanks clear up by week 8-10 with good flow, consistent lighting hours, and one or two snails to graze the worst of the film.
Stocking plan for a mixed soft and LPS reef
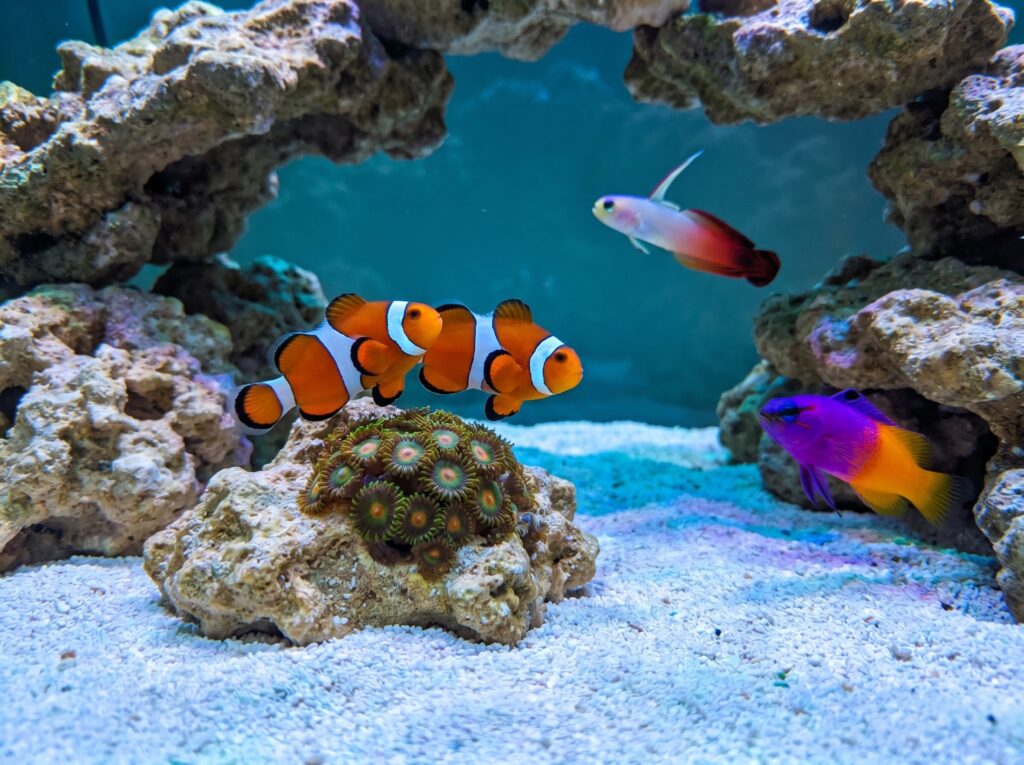
The 40B is a genuinely good home for a moderate fish load and a colorful coral mix. The limiting factor, as always, is biological filtration capacity and the social dynamics of a small volume - territorial disputes play out fast in 36 inches of swimming space.
A practical plan: add fish slowly, one at a time, spaced 2-3 weeks apart. The classic guide says no more than half an inch of adult fish per gallon of water. In a 40B that means a ceiling of about 20 inches of adult fish - which maps to four to six small reef fish depending on species. Start with the most docile; the bolder or more territorial fish go in last, when the pecking order is already set.
| Species | Adult size | Reef safe | Notes |
|---|---|---|---|
| Ocellaris clownfish (pair) | 2-3 in | Yes | Captive-bred; already eating prepared foods; a pair occupies one corner happily |
| Royal gramma | 3 in | Yes | Cave-oriented; one per tank; keeps to rock structure and rarely bothers other fish |
| Firefish goby | 3 in | Yes | Peaceful, mid-water hover; covered tank is required (will jump if startled) |
| Tailspot blenny | 2.5 in | Yes (soft/LPS) | Grazes film algae from rocks; stays out of the way of other fish; some individuals may nip SPS corals - monitor if you keep SPS frags |
That four-fish plan sits comfortably within the 40B's load. A clown goby or a small wrasse can replace the blenny if you prefer; avoid damsels (aggressive), dottybacks (very aggressive), and any tang - tangs need a minimum of 6 feet of swimming length to be healthy, and a 36-inch tank is genuinely too small regardless of what a retailer tells you.
For corals, build the tank as a soft and LPS system for the first year. Soft corals - mushrooms, zoanthids, pulsing xenia - tolerate the widest parameter swings. Mushrooms can thrive as low as 50 PAR; zoanthids prefer 100-150 PAR and stronger light brings out better color. Euphyllia LPS (hammer, frogspawn, torch) are the natural next step: they want 75-150 PAR, moderate indirect flow, and 3-6 inches of clearance from neighboring corals because their sweeper tentacles sting. Place Euphyllia in the lower to mid zone of the rockwork. A 40B's shallow depth means even the sand bed receives enough light for the right species - place your most light-hungry frags high and shade-tolerant mushrooms in the crevices beneath.
SPS is not off the table on a mature 40B, but it asks for very stable alkalinity, calcium, and magnesium, and it leaves little room for the parameter swings a new system sometimes produces. Treat SPS as a year-two project once you know your tank's consumption rates.
Maintenance rhythm for the long term
A 40B is not a low-maintenance tank - no reef is - but the routine is predictable once the tank matures. Weekly 10% water changes (4 gallons) replenish the trace elements that corals consume and dilute the nitrate and phosphate that filtration cannot export alone. LiveAquaria's guidance on water changes notes that "trace elements and essential minerals are often removed through filtration or are depleted as corals and invertebrates use them to grow. Water changes provide a fresh supply necessary for proper growth." Monthly testing of alkalinity, calcium, and magnesium tells you whether you need a two-part supplement, a calcium reactor, or simply larger or more frequent water changes to keep parameters steady.
Flow maintenance matters more than most new keepers expect. Clean the wavemakers monthly (salt creep clogs the impeller housing fast on 40B-scale powerheads), and check the skimmer neck weekly. A skimmer that has not been cleaned in three weeks pulls less efficiently - and the 40B's tight total volume shows that drop in nitrate readings within days.
The build sheet above accounts for every component a working 40B needs. Start with Path A if you want headroom to grow, Path B if you want simplicity without hang-on clutter, and Path C if the budget is tight or a sump stand is not an option. All three produce a real reef. The 36-inch footprint and the habits you build in the first six months take care of the rest.
Frequently asked questions
Can I keep a small tang in a 40-gallon breeder?
Tangs need long open swimming lanes to stay healthy and express natural behavior. A 36-inch tank is too short for every tang species, including those sold as "small" or "nano" tangs. A stressed tang in a confined tank shows faded color, erratic swimming, and deteriorating fins. Skip tangs at this size and revisit them if you upgrade to a 6-foot system.
Do I need a chiller for a 40-gallon breeder?
Most 40Bs in a temperature-controlled home stay within the 76-78°F target without a chiller. The risk period is summer: high-wattage lighting, a warm room, and low evaporation can push temps above 80°F. A quality heater controller and a small USB fan blowing across the water surface handle most situations. If your home runs above 78°F in summer, our chiller guide covers thresholds and options.
How much live rock goes in a 40-gallon breeder?
The old "one to two pounds per gallon" rule was written for dense Fiji rock. Modern dry rock and aquacultured live rock is lighter and more porous, so weight is a poor guide. Aim to fill roughly 15-20% of the display tank's volume with rock arranged to allow strong flow around and through the structure. For a 40B that works out to 35-50 lbs of typical porous dry rock, but your eye and the flow pattern matter more than the scale.
When can I add the first coral?
After the nitrogen cycle is complete: ammonia reads 0 ppm, nitrite reads 0 ppm, and nitrate has appeared and is detectable. Do not add coral before that point regardless of how clear the water looks. Add a few cleanup-crew snails and a hermit or two first to graze the diatom bloom. Give the tank another 2-3 weeks to stabilize, then start with a mushroom or a zoanthid frag - the two most forgiving coral types for a new system.
What is the difference between the 40-gallon breeder and a standard 40-gallon tank?
The standard 40-gallon tank is taller and narrower - roughly 36 x 12 x 16 or similar configurations depending on the manufacturer. The breeder footprint is 36 x 18, adding 6 inches of front-to-back depth. That extra depth gives you real aquascaping room, better light coverage across the full interior, and a wider base for a stable rock structure. For reef keeping, the breeder is almost always the better choice at this volume.