20-gallon reef tank build: the complete guide from first purchase to first coral
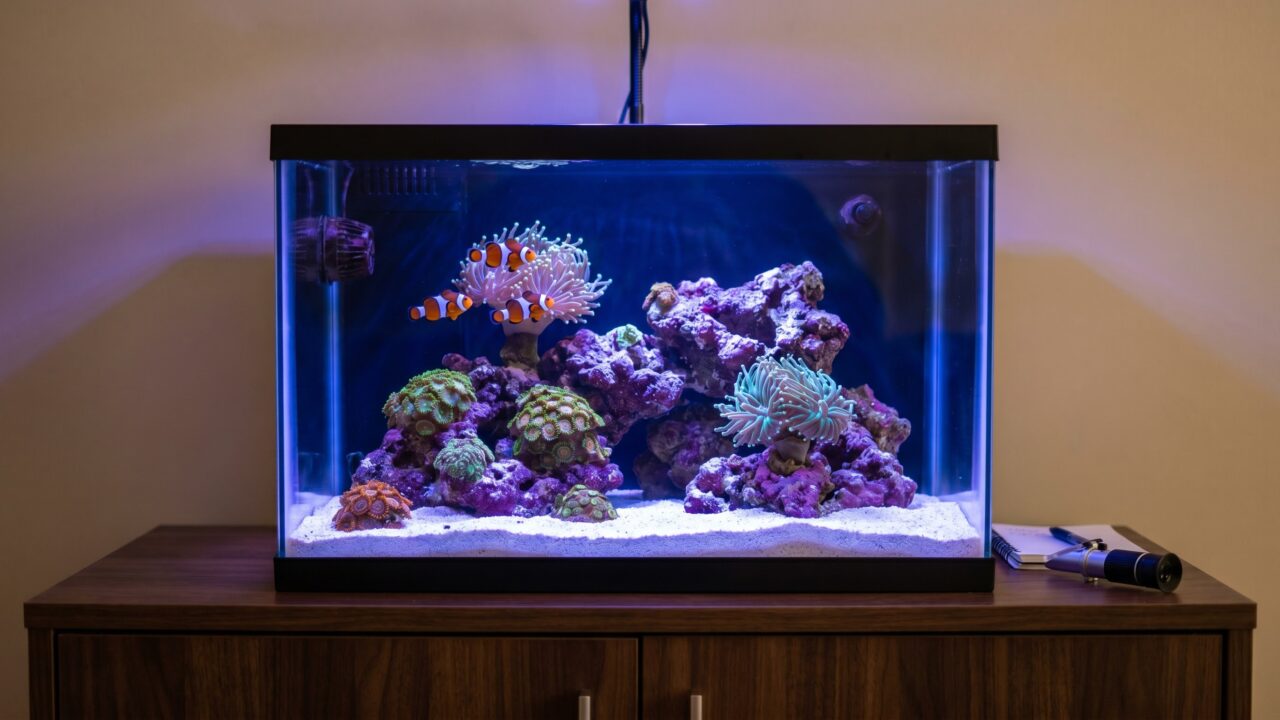
Twenty gallons is where most reef keepers start, and for good reason. The footprint fits a desk or sideboard, the budget stays manageable, and the volume is forgiving enough to hold parameters stable while you learn. A well-planned 20-gallon reef can hold a pair of clownfish, two or three other small fish, a full cleanup crew, and a genuine reef of soft and LPS corals - all in a space not much bigger than a carry-on bag. This guide walks you through every decision: tank choice, lighting, flow, heating, ATO, livestock, and budget, so you leave with a concrete build sheet you can take to your local fish store.
Choosing your tank: standard, long, or AIO?
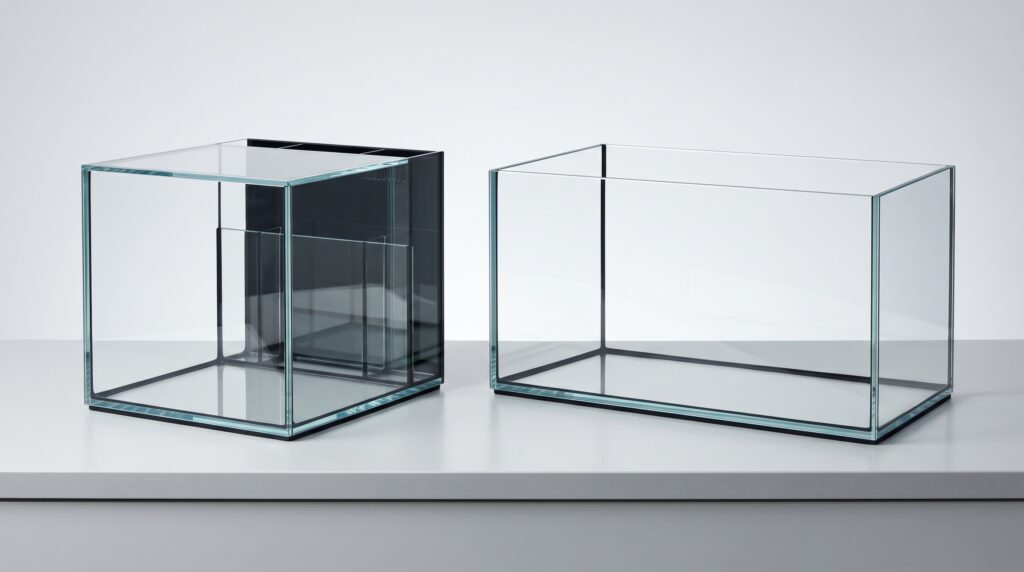
Your first decision is format. The standard 20-gallon High measures 24 inches long by 12 inches wide by 16 inches tall. The 20-gallon Long is 30 inches long by 12 inches wide by 12 inches tall - same volume, shallower water column and 25% more surface footprint. For a reef, the Long wins: shallower depth means light penetrates to the sandbed without fighting physics, and more bottom area means more aquascaping room. The Long is our default pick for a first build.
The third option is an all-in-one (AIO) system, which hides the filtration chambers behind a rear wall instead of running a separate sump. Two AIO tanks worth serious consideration:
- Waterbox AIO 20 Cube: 17.7 x 17.7 x 15.7 inches, 6 mm glass, included return pump and filter sock. Compact cube footprint suits shelves and office desks. Manufacturer lists display volume at 20 gallons.
- Innovative Marine NUVO Fusion Pro 2 (20 gal): 23.6 x 15 x 13 inches, 6 mm low-iron glass for excellent clarity, 326 GPH DC return pump with controller, dual directional nozzles, integrated emergency overflow and mesh lid.
Both AIO designs give you a clean look without external plumbing, and the rear chambers handle mechanical filtration, a heater, and an ATO reservoir. The trade-off is limited sump volume: on a lightly stocked system a skimmer is optional and you may not miss it, but retrofitting one later if you push bioload is harder than with a conventional sump build.
If you go with a bare standard tank, you will need a hang-on-back filter or small sump to handle mechanical filtration. A standard tank costs less up front; an AIO costs more but ships ready to plumb. For a first build with no sump experience, the AIO is the path of least frustration. For more on how tank format affects every piece of equipment downstream, see our guide to reef tank sizes.
The complete equipment list with sizing
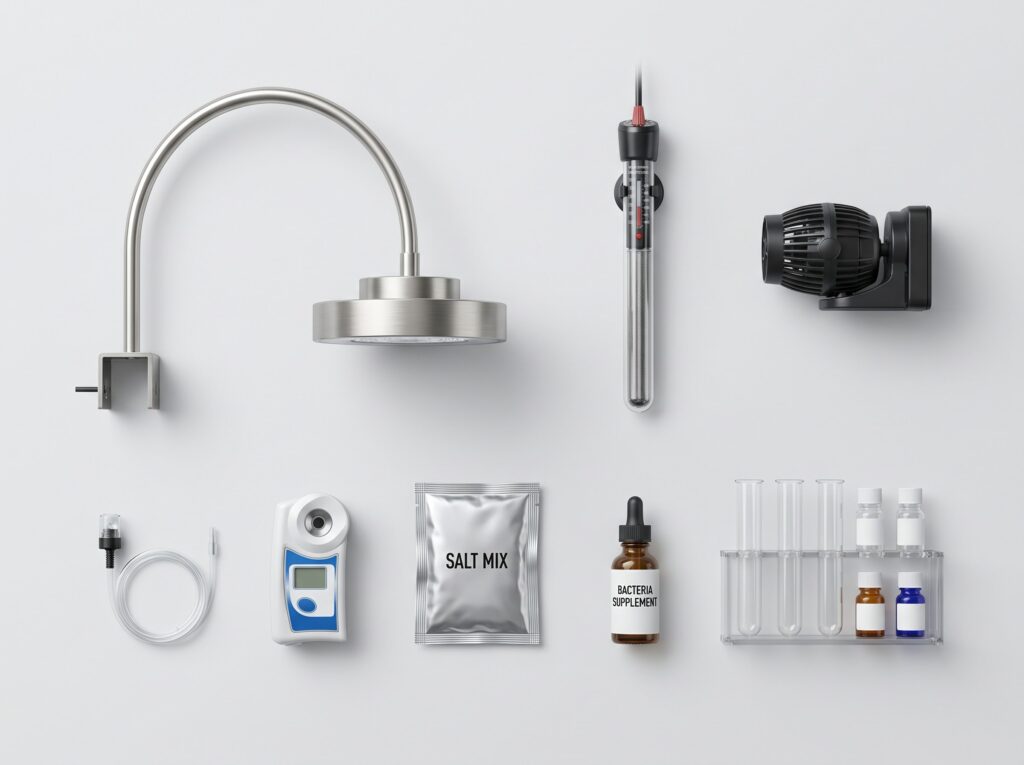
Below is the full build sheet - every piece of equipment, what to size it to, and our picks at two budget tiers. Prices are approximate US retail and will vary.
| Category | What to size it to | Budget pick (~price) | Performance pick (~price) |
|---|---|---|---|
| Tank / AIO | 20 gal long or AIO cube | Standard 20L bare tank (~$60) | IM NUVO Fusion Pro 2 20 (~$280) or Waterbox AIO 20 (~$250) |
| Stand | Rated for 200+ lbs (water weighs ~8.3 lbs/gal) | Metal tank stand (~$80) | Cabinet stand with doors (~$150-200) |
| Lighting | Covers the full footprint; 50-150 PAR for softies/LPS | Kessil A80 Tuna Blue - 15W, 18"x18" soft coral coverage (~$180) | AI Prime 16HD Reef - 55W, 24"x24" spread, peak PAR of 100 µMol at 24" depth (single-point center measurement per AI spec sheet) (~$280) |
| Heater | 75W for 20 gal; Eheim Jager 75W rated for 16-26 gal | Eheim Jager 75W (~$45) | Dual 50W Eheim Jager units for redundancy (~$80 pair) |
| Wavemaker / flow | 20x turnover minimum; 400-600 GPH for 20 gal | Hygger 400 GPH nano powerhead (~$35) | EcoTech MP10mQD - 2,500 GPH max, 8-19W, 2.5-50 gal range (~$220) |
| Return pump (sump builds only) | 200-300 GPH after head loss | Sicce Syncra 1.0 (~$50) | Included in AIO; Eheim 600 for sump builds (~$90) |
| ATO (auto top-off) | Nano AIO chamber or external; senses to 0.5 mm | IceCap ATO (~$70) | Tunze Osmolator 3 Nano 3151 - suits tanks up to 66 gal, 0.5 mm accuracy (~$130) |
| Protein skimmer | Optional on lightly stocked 20 gal; strongly recommended at 3+ fish | Tunze Comline 9004 (~$80) | IceCap K1-Nano (~$100) |
| Refractometer | Optical or digital; calibrate with calibration fluid. Do not use a swing-needle hydrometer - they drift badly and are not accurate enough for a reef. | Optical refractometer with ATC (~$25) | Hanna HI98319 digital salinity meter (~$120) |
| Test kit - water chemistry | At minimum: ammonia, nitrite, nitrate, alkalinity, salinity | API Saltwater Master Kit (~$30) | Hanna Checker suite: HI772 alkalinity, HI758 calcium, HI781 nitrate (~$75 each) |
| Salt mix | Targets SG 1.025-1.026; consistent Alk/Ca/Mg | Instant Ocean (~$35 / 50 gal) | Tropic Marin Pro-Reef (~$55 / 80 gal) |
| Substrate | ~20 lbs aragonite sand (1" bed) or bare bottom | CaribSea Arag-Alive (~$35) | CaribSea Special Grade Reef Sand (~$40) |
| Rock | 15-25 lbs dry rock or 10-15 lbs live rock | Pukani dry rock (~$40) | Live rock, seeded (~$80-120) |
| RO/DI water | 0 TDS; buy locally or make your own | Buy from LFS (~$0.25-0.50/gal ongoing) | Coralife Pure-Flo or similar home unit (~$150 up front) |
| Seachem Stability (cycle bacteria) | Dose per label: heavy on day 1, lighter for days 2-7; Seachem states fish may be added at any time while dosing is maintained for 7 days | ~$12 / 250 mL (one size fits all) | |
Budget breakdown: what this build actually costs
Two realistic build scenarios, from "spend carefully" to "buy right once."
| Category | Budget build | Performance build |
|---|---|---|
| Tank + stand | $140 | $430 (AIO + cabinet) |
| Lighting | $180 | $280 |
| Heater | $45 | $80 |
| Flow (wavemaker) | $35 | $220 |
| ATO | $70 | $130 |
| Skimmer | $80 | $100 |
| Testing (refractometer + kits) | $55 | $300 |
| Salt, sand, rock, bacteria | $130 | $200 |
| Miscellaneous (plumbing, mag float, buckets) | $50 | $80 |
| Dry goods total | ~$785 | ~$1,820 |
| Livestock - CUC (snails, hermits, shrimp) | $40 | $60 |
| Livestock - fish (pair clowns + 2 others) | $80 | $150 |
| Livestock - frags (3-5 softies / LPS) | $60 | $150 |
| All-in total | ~$965 | ~$2,180 |
Running costs after setup are roughly $30-60 per month: salt, RO water or filter media, a water change bucket, and occasional frag or livestock additions. For a detailed monthly breakdown, see our reef tank cost guide.
Lighting: the most consequential decision
For a softie and LPS reef, you need 50-150 PAR across the rockwork - enough to grow zoanthids, mushroom corals, hammer corals, and frogspawn without bleaching them. Both ATI North America's published parameters and the manufacturers' own PAR data confirm this range.
The Kessil A80 Tuna Blue runs at 15W and covers 18 x 18 inches for soft corals or 12 x 12 for a mixed reef. At $180, it is the honest value choice for a 20L or a small cube. Its dense-matrix optics produce coral-quality light that many fixtures twice its price cannot match per watt.
The AI Prime 16HD Reef pulls 55W and spreads 24 x 24 inches, with a published peak PAR of 100 µMol at 24 inches depth. It covers the full footprint of a 20L easily, and its app control lets you dial in sunrise/sunset schedules and fine-tune spectrum. For a build where you want room to grow into LPS without buying a second light, the Prime 16HD is the better long-term investment.
Whichever light you choose, run a 9-10 hour photoperiod with a 2-hour ramp up and ramp down. New corals should be introduced at 60-70% intensity and eased up over two weeks. For the schedule logic, see reef tank lighting schedule.
Flow, heating, and top-off: the three life-support systems
Reef chemistry does not drift by itself - evaporation, bioload, and daily photosynthesis all push parameters. These three systems keep the numbers stable between water changes.
Flow
Corals need flow to deliver food and carry away waste. Twenty times total volume per hour is the practical minimum for a mixed softie/LPS reef - so a 20-gallon tank wants 400 GPH of total flow. The EcoTech MP10mQD runs 2,500 GPH at max but is tunable down to a gentle pulse; its 2.5 to 50 gallon rated range makes it the exact right size for a 20-gallon build. At 8-19W it barely affects your electricity bill. If the MP10 is over budget, any adjustable nano powerhead rated 400-600 GPH does the job - run it on pulse mode to avoid dead spots. See the detailed sizing guide at wavemakers and powerheads.
Heating
The Eheim Jager 75W is factory-rated for 16-26 gallons. Keep the target at 77-78°F (25-26°C) - within the 75-78°F range confirmed by ATI North America's parameters - and set the heater two degrees above your typical room temperature to reduce cycling. Two smaller heaters (a pair of 50W units) offer better insurance: if one fails on, it can only raise temperature 4-5°F instead of cooking the tank. The Eheim Jager line has a calibration dial and laboratory-grade glass construction, which matters when your tank lives in a climate-controlled home. More detail at reef tank heaters.
ATO (auto top-off)
A 20-gallon reef loses roughly half a gallon to evaporation per day in a warm room. That evaporation raises salinity - quickly. Without an ATO, salinity in a 20-gallon can shift 0.001-0.002 SG in a single day, which stresses coral tissue. The Tunze Osmolator 3 Nano 3151 detects water level changes to 0.5 mm accuracy, is rated for aquariums up to 66 gallons, and includes an anti-overfill safety cut-off that stops the pump if the sensor is fouled. Fill the ATO reservoir with 0 TDS RODI water only - never premixed salt water. For a deeper look at ATO selection and setup, see auto top-off systems.
Cycling your 20-gallon reef: week-by-week first month
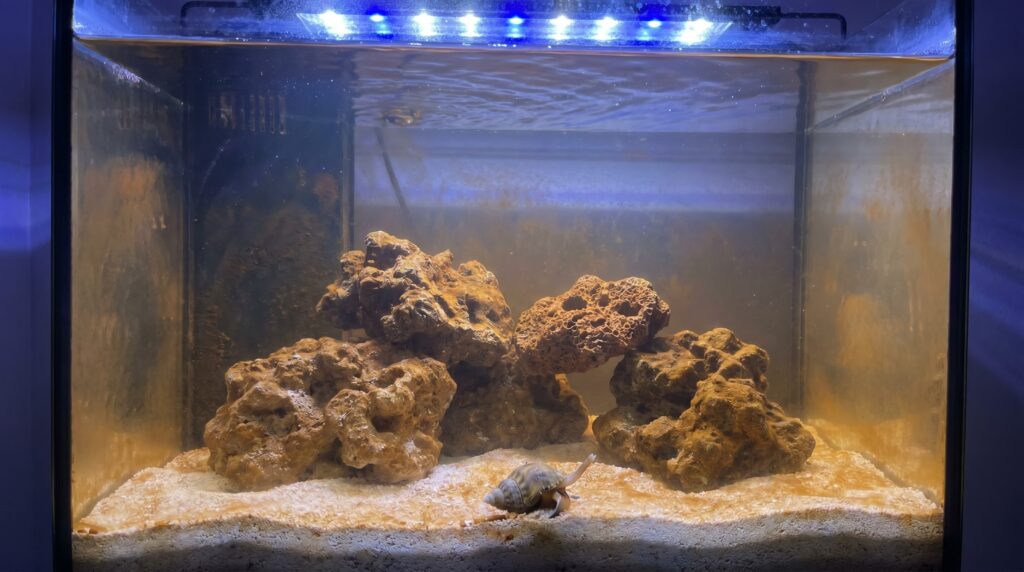
The nitrogen cycle is the one process you cannot shortcut. Ammonia from fish waste and organic decay is converted first to nitrite (both are toxic to fish and corals), then to nitrate (harmless at low levels). AquariumScience.org data puts the timeline at four to eight weeks - ammonia and nitrite both reading zero is the milestone, not a calendar date. Patience here pays off for the next several years.
Here is what the first month looks like:
| Week | What's happening | Your tasks | What you might see |
|---|---|---|---|
| Week 1 | Ammonia rises as bacteria are absent | Fill tank with RODI + mixed saltwater. Add rock, sand. Add Seachem Stability per label (day-1 heavy dose). Dose ammonia source (a pinch of fish food). Test daily. | Ammonia reading climbs. Clear or slightly cloudy water. |
| Week 2 | Nitrosomonas colonize rock; nitrite rises | Continue daily Stability dose per label (maintenance dose). Keep lights off or on timer. Test ammonia + nitrite every other day. | Ammonia starts dropping. Nitrite spikes. Possible first diatom bloom on sand - normal. |
| Week 3 | Nitrospira building up; nitrate appears | Test ammonia, nitrite, nitrate every 2 days. Verify salinity daily (ATO running). Check heater calibration. | Nitrite peak. Brown diatom film on glass and sand - the "ugly stage." Do not scrub it; it passes. |
| Week 4 | Ammonia and nitrite approaching zero | When ammonia and nitrite both read zero on two consecutive tests 24 hours apart, do a 20% water change to knock down accumulated nitrate. Cycle complete. | Water clarifying. Diatoms receding. Coralline algae may start on rock. |
Only after confirmed cycle completion should any livestock enter the tank. Add the cleanup crew first - they handle the remaining diatoms and establish the sandbed. The nitrogen cycle is covered in detail at how to cycle a reef tank, and the brown ugly phase has its own full guide at reef tank ugly stage.
Stocking plan: fish, cleanup crew, and corals
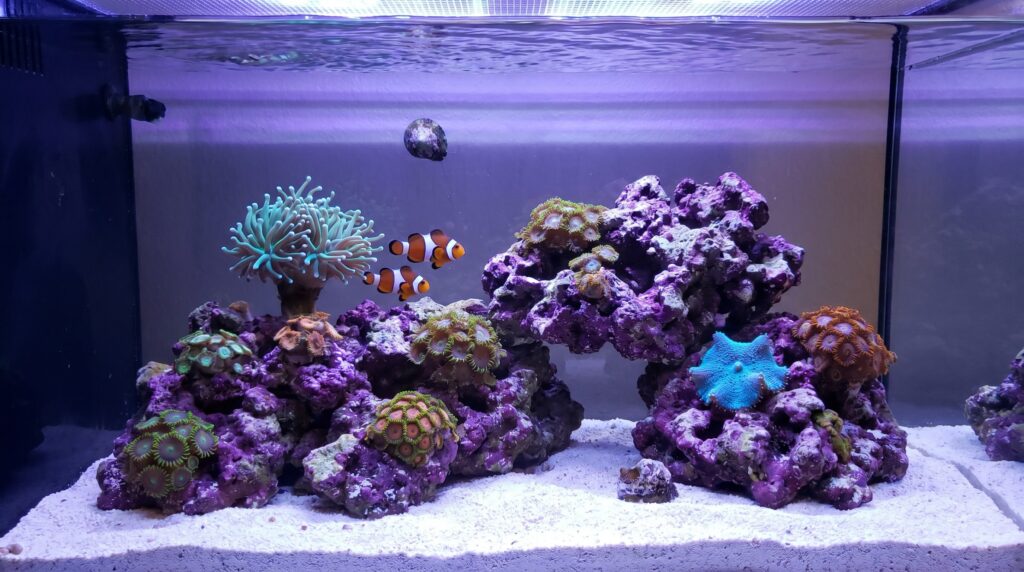
A 20-gallon reef has real limits. Four fish is a comfortable ceiling for most builds; six is possible only if all are small-bodied and lightly fed. Overstocking is the single most common cause of high nitrate and algae problems in nano reefs.
Fish stocking sequence
Add fish in order, from least territorial to most. Wait two weeks between additions. Quarantine each new fish in a separate tank for two to four weeks before it enters the display - this one habit prevents the majority of disease outbreaks.
| Fish | Adult size | Notes | Add order |
|---|---|---|---|
| Pair of ocellaris or percula clownfish | 2-3 inches (females larger) | Reef-safe; captive-bred do not require an anemone; will often host hammer or frogspawn corals instead. Minimum tank 10 gal but a pair fills a 20 gal nicely. | 1st |
| Firefish goby (Nemateleotris magnifica) | 3 inches max | Peaceful, shy, excellent nano fish. Cover the tank - they jump when startled. | 2nd |
| Tailspot blenny (Ecsenius stigmatura) | 2.5 inches max | Grazes film algae from glass. Personality fish; curious and entertaining. One per tank. | 3rd |
| Optional 4th: small goby/shrimp pair | 1.5-2 inches | Watchman goby + pistol shrimp is a crowd favorite for 20 gal. Adds behavioral interest without significant bioload. Stop here. | 4th (optional) |
For the full approved species list for this tank size, see best fish for a 20-gallon reef tank.
Cleanup crew
Add the CUC two weeks after the cycle completes, before any fish. Drip-acclimate all invertebrates over 45-60 minutes before releasing them into the tank - they are far more sensitive to salinity and temperature shifts than fish. A reasonable starting CUC for a 20-gallon reef:
- 10 Nassarius snails (sand-sifters; dive under the sand and emerge to eat meatier waste)
- 5 Trochus or Astrea snails (glass and rock grazers)
- 2-3 blue-leg or scarlet hermit crabs (keep the number low; they will evict snails to steal shells)
- 1 Skunk cleaner shrimp or Peppermint shrimp (Peppermint shrimp are valuable later if Aiptasia anemones appear)
Add more snails as the tank matures and algae load increases. Do not overstock the CUC; more animals than the system can feed will starve and die, crashing parameters.
One warning that catches new reefers off guard: never use copper-based medications in a reef tank. Copper kills invertebrates and corals at even low doses. If a fish develops ich or another disease, it must be treated in a separate quarantine tank, never in the display. This is why a quarantine tank - even a bare 10-gallon - is worth setting up before you add your first fish. See our detailed guide at best clean-up crew.
Coral path: softies to LPS
ATI North America's published PAR targets confirm that soft corals and LPS corals both thrive in the 50-150 PAR range - which means your 20-gallon setup, running either the Kessil A80 or AI Prime 16HD, can support both categories without changing your light.
Start with the hardiest softies, which tolerate the widest swings in chemistry while you dial in your system. Move to LPS frags once parameters have been stable for six to eight weeks. SPS corals are for later - they demand 200-500 PAR and pristine chemistry that takes months of experience to maintain. See the honest SPS readiness checklist at SPS corals: are you ready.
| Coral | Category | PAR range | Flow preference | Timing |
|---|---|---|---|---|
| Zoanthids / Palythoa | Soft | 50-100 | Low-medium | Month 2 |
| Mushroom corals (Discosoma, Rhodactis) | Soft | 50-100 | Low | Month 2 |
| Leather corals (toadstool, finger leather) | Soft | 50-150 | Medium | Month 2-3 |
| Hammer coral (Euphyllia ancora) | LPS | 75-150 | Low-medium | Month 4+ |
| Frogspawn (Euphyllia divisa) | LPS | 75-150 | Low-medium | Month 4+ |
| Candy cane coral (Caulastrea) | LPS | 50-150 | Low-medium | Month 4+ |
For placement decisions - light zones on the rock, which corals need buffer space - see coral placement: light and flow. Beginner softie and LPS options are covered in depth at soft corals for beginners and LPS corals for beginners.
Water parameters and the weekly maintenance routine
These are the numbers your 20-gallon reef needs to hit and hold. Stability beats chasing the perfect number. A tank running consistently at alkalinity 9 dKH will grow better coral than one that swings from 8 to 11 dKH week to week, even if 9 dKH is not the theoretical ideal. Pick a number in the middle of each range and keep it there.
| Parameter | Target range | Notes |
|---|---|---|
| Salinity | 1.025-1.026 SG / 35-35.5 ppt | Measure with a refractometer, not a swing-needle hydrometer. Tropic Marin specs quote 1.025-1.027; aim for 1.025-1.026 in a mixed reef. |
| Temperature | 75-78°F (24-26°C) | ATI: 75-78°F optimal. Stable is more important than exact. |
| Alkalinity | 8-11 dKH | ATI range: 8-12 dKH. Pick a number in the middle, stay there. |
| Calcium | 400-450 ppm | Hanna HI758 colorimeter gives precise readings cheaply. |
| Magnesium | 1,250-1,350 ppm | Magnesium buffers calcium-alkalinity balance; check monthly. |
| pH | 7.8-8.4 | Natural daily swing is normal; check at the same time of day. |
| Nitrate | 1-10 ppm | Not zero - zero nitrate starves corals and risks dinoflagellate blooms. |
| Phosphate | 0.03-0.10 ppm | Not zero - zero phosphate starves corals and can trigger dinoflagellate blooms. Use an ultra-low range phosphate checker (such as the Hanna HI774) for reliable readings. |
Tropic Marin recommends replacing 10% of total tank volume weekly with freshly mixed saltwater. For a 20-gallon system, that is 2 gallons every Sunday. That single habit - more than any supplement or additive - keeps nitrate in check, replenishes trace elements, and prevents slow parameter drift. Always match the temperature and salinity of replacement water to the display tank before adding it. The full water change protocol is at how to do a reef tank water change.
The first six months: what to expect and what not to panic about
New 20-gallon reefs follow a predictable sequence of algae blooms and small crises. Almost every new reefer panics at week three. Most of those tanks are thriving by month six. Here is what the pattern looks like.
Weeks 1-4 (cycling): Ammonia and nitrite spike, then fall. Brown diatom film covers every surface - rock, glass, and sand. This is not a failure. Diatoms are the first colonizers in any new reef, feeding on the silicate released from new sand and rock. They disappear on their own within a few weeks once the silicate is consumed. Your CUC and flow rate speed this up.
Months 2-3: Diatoms fade, then green hair algae or cyanobacteria (red or blue-black slime) may follow. Both are nutrient-driven and are addressed with more flow, reduced feeding, a larger CUC, and consistent water changes. The ugly stage guide walks through each phase in order.
Month 3-4: Purple coralline algae begins encrusting the rock and back glass. Coralline is a sign of stable calcium and alkalinity. Let it grow - it crowds out nuisance algae and signals that your parameters are holding.
Month 4-6: Parameters stable, algae manageable, CUC established. Time for your first LPS frags. Keep water changes consistent. A 20-gallon reef fully settled at six months is genuinely beautiful.
Common beginner mistakes - rushing livestock, skipping the ATO, ignoring salinity drift - are covered in depth at beginner reef tank mistakes. The full equipment framework for scaling to larger tanks lives at reef tank equipment list by size.
Frequently asked questions
Can I skip a protein skimmer on a 20-gallon reef?
On a lightly stocked system (one to two fish, small CUC, no overfeeding), weekly 10% water changes can handle the nutrient load without a skimmer. Add a skimmer once you reach three or more fish or start feeding meaty LPS corals regularly. Skipping it is a risk management decision, not a rule.
How long can I leave my 20-gallon reef unattended?
With a reliable ATO and an auto-feeder, four to five days is manageable. The ATO keeps salinity from climbing due to evaporation. Beyond five days, arrange for someone to do a visual check and top off manually if the ATO reservoir runs dry. Parameters in a small tank shift faster than in large systems.
Do I need a sump on a 20-gallon reef?
No. An AIO tank with rear filtration chambers handles mechanical filtration, a heater, and an ATO sensor without any external plumbing. A sump adds water volume (stabilizing parameters) and more room for equipment, but the complexity is not justified on a first 20-gallon build. Many experienced reefers prefer AIO tanks at this size permanently.
What's the cheapest way to start a 20-gallon reef without sacrificing the build?
Buy secondhand for everything except the heater and lighting. A used AIO tank and stand cuts costs by 40-60%. Never buy a used heater (failure risk is high). Spend full price on a reliable light - cheap no-name LED panels do not produce the spectrum reef corals need. See the full breakdown at cheapest way to start a reef tank.