What you need to start a reef tank: the complete shopping list with honest skip-it calls
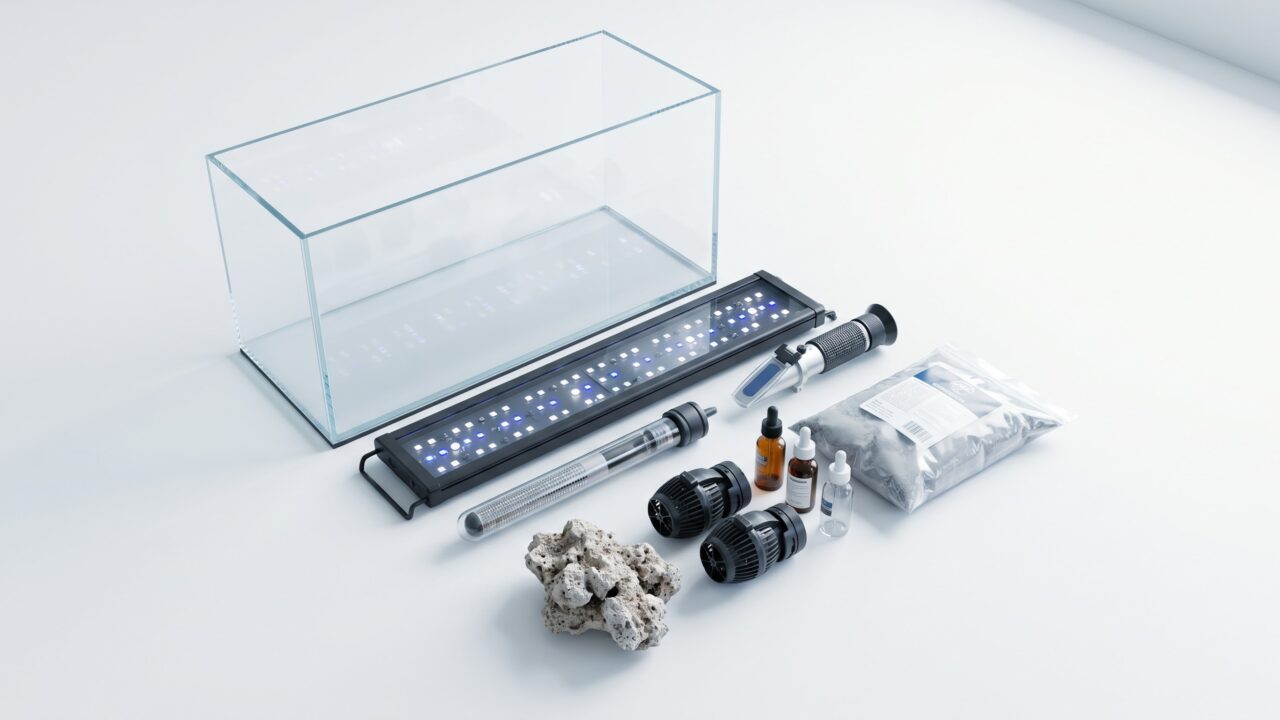
Most reef tank shopping lists read like a wish list written by someone who already owns everything on it. Below is every major category of gear, what it actually does, and a straight call on whether you need it on day one, whether you can add it later, or whether you can honestly skip it for now. The decision table at the end organizes all of this by tank size so you can match the list to your budget and your setup.
The tank itself
Size matters more for stability than for cost. Smaller volumes swing faster: a 10-gallon tank can lose a meaningful percentage of its water to evaporation in a single hot day, spiking salinity within hours. A 40-gallon tank gives that same evaporation loss a much smaller proportional impact. That is why water stability, not visual drama, is the main argument for going bigger as a beginner.
A 20-gallon long is the practical floor for a first reef. It is affordable, easy to light, and does not require a sump or a protein skimmer. A 40-gallon breeder is widely considered the sweet spot: enough volume to forgive a missed water change, enough footprint for a satisfying coral layout, and still manageable as a single-light build. Anything above about 75 gallons starts demanding a sump, a return pump, and a more serious lighting budget from day one.
All-in-one (AIO) tanks deserve a mention here. Many AIO designs under 40 gallons include a rear filtration chamber that handles flow, biological media, and a heater compartment in one package. They simplify the build and are a reasonable choice for first tanks. See our reef tank starter kits compared guide for a breakdown of popular AIO options.
Lighting
Corals depend on light for photosynthesis through their symbiotic algae (zooxanthellae), so reef lighting is not optional. The brightness unit that matters is PAR (Photosynthetically Active Radiation). Soft corals thrive in the 50-150 PAR range, most LPS corals want 100-200 PAR, and SPS corals push into 200-400 PAR or higher. As a beginner focusing on soft corals and easy LPS, you need a fixture that can deliver roughly 100-200 PAR at the sandbed without cooking the tank.
Modern LED fixtures handle this well. Look for a reef-specific LED that covers your tank footprint, has a blue-heavy spectrum (the 430-480 nm blue band is where zooxanthellae chlorophyll absorbs most efficiently, with chlorophyll a peaking around 430 nm), and allows dimming. Budget-friendly options from brands like Kessil, AI, and similar manufacturers have dropped in price considerably. For a nano or 20-gallon build, a single mid-range LED will cover you. A 40-gallon breeder typically needs two fixtures or one high-output unit. The key detail is coverage area and PAR output at depth, not wattage alone. Our reef tank equipment list by size includes specific fixture recommendations matched to tank footprints.
Do you need expensive lighting on day one? Yes, for a reef. This is the one category where skimping genuinely limits what you can keep. A freshwater planted light will not cut it.
Flow: wavemakers and powerheads
Corals in the wild live in moving water. Stagnant water in an aquarium allows detritus to settle on coral tissue, reduces gas exchange, and creates dead zones where nutrients concentrate. A wavemaker or powerhead keeps water moving, exports waste to filtration, and delivers dissolved oxygen and food to stationary animals.
The rule of thumb for a mixed soft-coral and LPS reef is 10-20 times the tank volume per hour in total flow. On a 30-gallon tank that means 300-600 GPH of combined circulation. SPS-heavy tanks push that number higher, to 40-50 times volume, but beginners can ignore that for now. Two smaller powerheads aimed to cross-flow in the middle of the tank will serve most starter builds better than a single large unit pointed directly at the corals.
Wavemakers with a pulse or wave mode are worth the small price premium over fixed-flow pumps. The variable pattern prevents dead spots and is generally better for coral polyp extension. Budget wavemakers from brands like Hygger or Jebao are entirely serviceable for tanks under 60 gallons.
Heating
Reef inhabitants are adapted to a stable, narrow temperature range. For a mixed reef, that target sits between 75°F and 78°F, and the daily swing should stay within about 1-2°F. A tank that holds a steady 79°F is healthier than one that swings between 75°F and 78°F every day because corals cannot regulate their own body temperature.
Sizing: about 3-5 watts per gallon of heating capacity is the standard starting point. On a 40-gallon tank, two 100W heaters beat one 200W unit. Two smaller heaters provide redundancy: if one fails cold, the other holds the tank rather than leaving you with nothing. If one fails hot and sticks on, only half your wattage is running uncontrolled instead of the full load - a smaller problem than a single 200W heater stuck on. Titanium heaters with external controllers are the most durable option for saltwater, since glass heaters can crack and leach nothing helpful. At minimum, use a separate digital thermometer so you are not trusting the heater's own dial.
For more on stable temperature management, see our reef tank temperature guide.
Water: RODI versus buying pre-made saltwater
Tap water is not suitable for a reef tank, full stop. Tap supplies in most areas contain phosphate at roughly 0.5-2 ppm (municipal water averages around 1 mg/L), chloramine or chlorine, silicates, and trace copper. Even copper at concentrations safe for humans is toxic to corals and invertebrates. Phosphate inhibits the calcification process that stony corals depend on, and silicates feed the diatom blooms that will plague a new tank anyway without adding fuel from your own tap.
RODI (reverse osmosis, deionized) water removes all of this, producing water with a TDS (total dissolved solids) reading of essentially zero. You then add a quality salt mix to that clean baseline. The two main routes:
- Buy pre-mixed saltwater from a local fish store. Convenient for small tanks, but expensive ongoing, and you are trusting their water quality and mixing consistency.
- Own an RODI unit ($100-250 for a basic 50-100 GPD unit). Higher upfront cost, but the cheapest long-term option once you have more than about 40 gallons to maintain.
For a single 20-gallon tank doing modest water changes, buying RODI water by the jug (many LFS sell it at $0.25-0.50 per gallon) is genuinely reasonable. Once you are running multiple tanks or a 50+ gallon system, the payback on your own unit is fast. Our RODI systems for reef tanks guide covers what to look for in a home unit.
Once you have your RODI water, you need a quality salt mix. Brands like Red Sea, Tropic Marin, and Fritz are reputable starting points. Red Sea Coral Pro Salt mixes to approximately 11-12 dKH alkalinity, 435-465 ppm calcium, and 1310-1390 ppm magnesium at 34 ppt. Tropic Marin Pro-Reef targets 7-8 dKH alkalinity, 440 ppm calcium, and 1350 ppm magnesium. The specific numbers matter less than using a consistent brand and mixing to 35 ppt (specific gravity 1.025-1.026). For help choosing, see best salt mix for a reef tank.
Live rock and sand
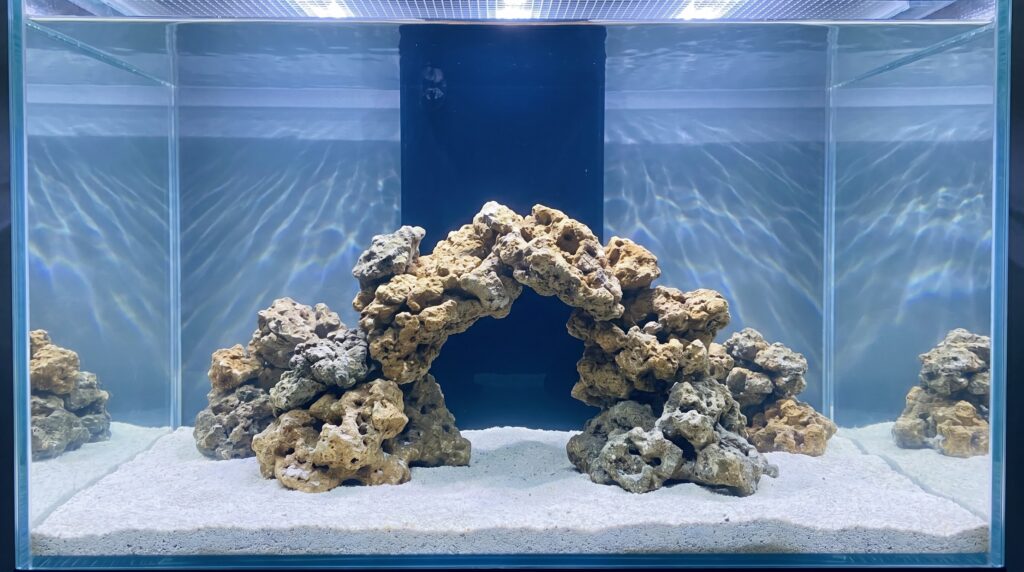
Rock is the biological heart of a reef tank. It provides surface area for the nitrifying bacteria that process ammonia into nitrite and then nitrate, and it gives corals and fish a structure to inhabit. You cannot skip it.
Live rock arrives pre-colonized with bacteria and can cycle a new tank in 1-2 weeks. Dry rock (cured or manufactured) is free of pests but starts with no bacteria, adding weeks to the cycling process. The practical approach for most beginners is a mix: some dry base rock for structure and cost savings, plus a piece or two of live rock or a dose of bottled nitrifying bacteria to seed the cycle. The old guideline of one pound of rock per gallon still works as a rough estimate for a traditional aquascape, though actual requirements depend on the rock's porosity and your stocking level.
Sand is optional. A shallow sand bed (about 1-2 inches) looks natural, houses beneficial microfauna, and is required for some fish species like certain gobies and wrasses that burrow. Bare bottom is easier to siphon and performs better under high flow for SPS tanks. Both work. If you like the look of sand and plan a mixed reef with fish, go for it. If you are uncertain, start bare bottom and add sand later. For a full comparison, see our live sand vs dry sand vs bare bottom guide.
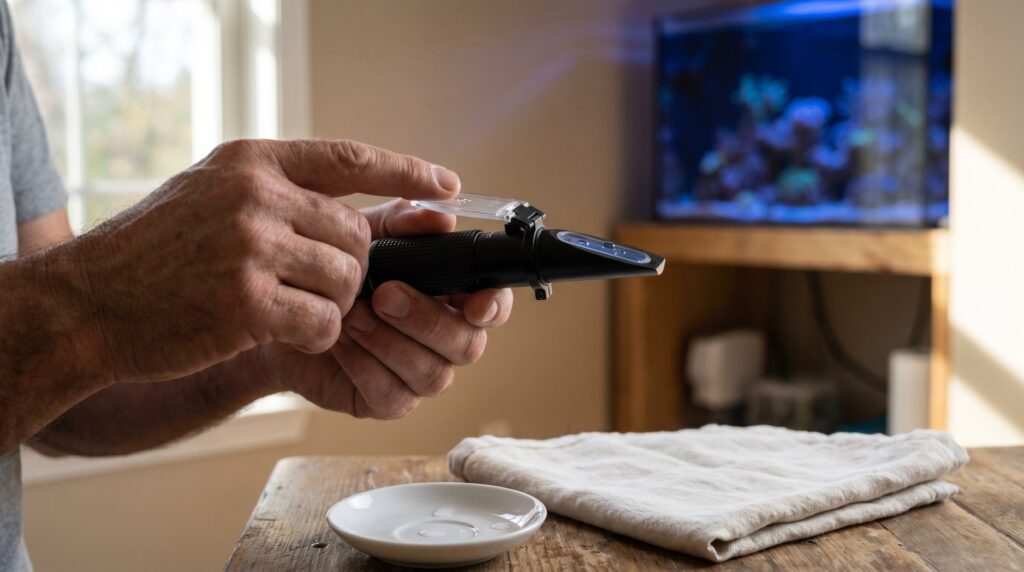
Test kits
You cannot manage what you cannot measure. For cycling and the first months of a reef, you need at minimum:
- Ammonia, nitrite, and nitrate (liquid drop kits or dip test strips; liquid kits are more accurate)
- Salinity, measured with a calibrated refractometer (swing-arm plastic hydrometers give inconsistent readings; a refractometer costs about $20-30 and is worth it)
- pH (included in most basic saltwater test kits)
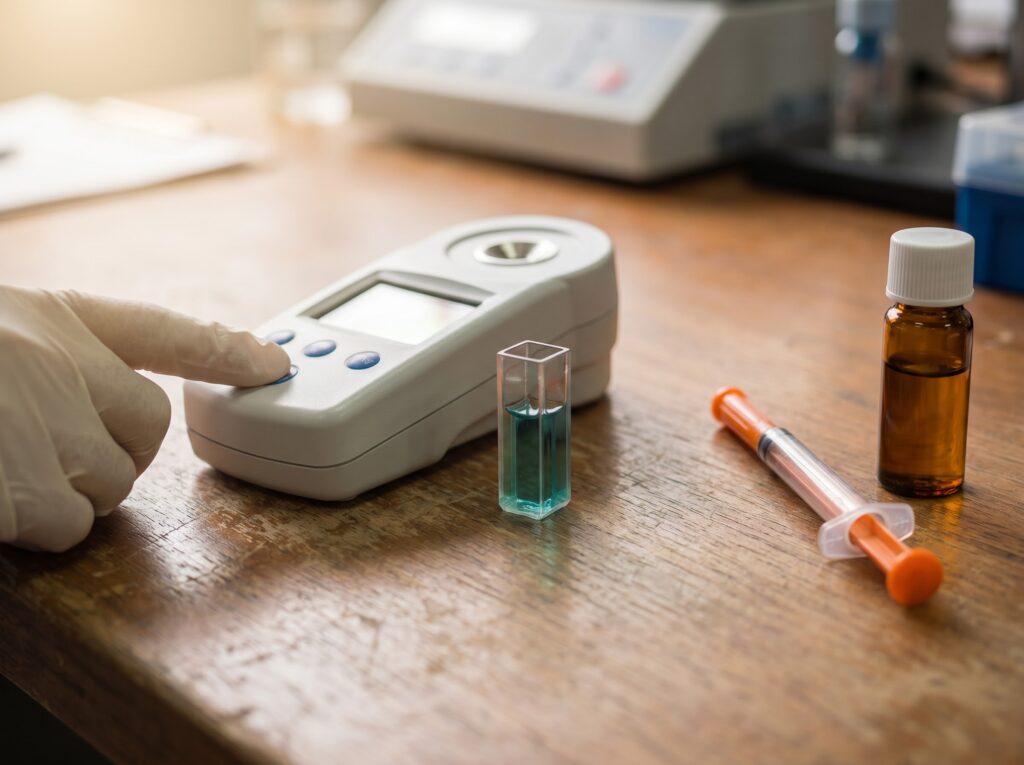
Once corals are in the tank, add:
- Alkalinity (dKH) - the parameter to test most frequently; the Hanna HI772 colorimeter measures 0.0-20.0 dKH with ±0.3 dKH accuracy and is the hobbyist standard
- Calcium (ppm) - Salifert or Red Sea kits are reliable
- Magnesium (ppm) - less frequent; test monthly once stable
Test at least weekly, and daily during the cycling stage and the first month with livestock. Once the tank is stable and you know your consumption rates, weekly alkalinity and salinity checks, plus monthly calcium and magnesium, is a reasonable maintenance rhythm. More detail on what each parameter means and how to keep it in range lives in our water parameters guide.
The protein skimmer question
A protein skimmer pulls dissolved organic compounds (DOC) out of the water column before they break down into ammonia. On a lightly stocked tank with regular water changes, beneficial bacteria in your rock and sand handle that job adequately without a skimmer. On a heavily stocked system with a sump, a skimmer becomes a meaningful nutrient export tool.
The honest call by tank size:
- Under 30 gallons, lightly stocked: a skimmer is not necessary. Regular 10-15% weekly water changes and healthy rock cover the bioload of a few fish and soft corals. Running a skimmer during an active cycle can also remove dissolved organics that feed the bacteria you are trying to grow, so most experienced keepers leave it off until the cycle is complete.
- 30-75 gallons, moderate stocking: a skimmer becomes useful but is still optional if your water change discipline is solid. Add it when you see rising nitrates that water changes alone are not controlling.
- 75 gallons and above, or any system with a sump: put a skimmer on the short list from the start. The nutrient load scales faster than your rock can handle alone.
For a deeper explanation of how skimmers work and how to size one, see protein skimmers explained.
What you can skip for now
Several items appear on generic reef shopping lists but are not necessary at the start:
- Dosing pump: calcium and alkalinity consumption is low on a new tank with few or no stony corals. Weekly water changes with a quality salt mix maintain these parameters adequately. Add a two-part dosing system only when your coral load grows enough that changes alone cannot keep up. Learn more at dosing pumps explained.
- Aquarium controller: useful and convenient for monitoring temperature, pH, and flow remotely, but entirely optional for a beginner build. A thermometer and manual tests cover the same ground at far lower cost.
- Calcium reactor: complex and expensive. Relevant for mature SPS-dominated tanks with high mineral demand. Ignore it for the first year.
- UV sterilizer: reduces free-floating pathogens and algae spores. Helpful in some scenarios, but it is not a substitute for quarantine and adds complexity a new tank does not need.
- Chiller: necessary only if your room temperature pushes the tank above 80-82°F in summer. Most temperate-climate homes do not need one. Check out do I need a chiller to assess your situation.
Essential, later, and skip: the full decision table by tank size
The table below is the practical synthesis of everything above. "Essential" means get it before livestock goes in. "Later" means start without it, add when the listed condition applies. "Skip" means it is not needed for a successful reef at that size.
| Equipment | Under 30 gal (nano) | 30-75 gal (mid-size) | 75+ gal (larger) | When to upgrade "Later" items |
|---|---|---|---|---|
| Aquarium (glass or acrylic) | Essential | Essential | Essential | - |
| Reef-capable LED light | Essential | Essential | Essential | - |
| Wavemaker / powerhead | Essential | Essential | Essential | - |
| Heater (+ thermometer) | Essential | Essential | Essential (×2) | - |
| RODI water or pre-made saltwater | Essential | Essential | Essential + own RODI unit | Buy own unit when maintenance cost exceeds unit cost |
| Quality salt mix | Essential | Essential | Essential | - |
| Calibrated refractometer | Essential | Essential | Essential | - |
| Ammonia / nitrite / nitrate test kit | Essential | Essential | Essential | - |
| Alkalinity (dKH) test kit | Essential (once corals added) | Essential (once corals added) | Essential | Add before first coral purchase |
| Calcium test kit | Later | Later | Essential | Add with first stony corals |
| Magnesium test kit | Later | Later | Later | Add when Ca/Alk stable but corals struggling |
| Live rock / dry rock + bacteria | Essential | Essential | Essential | - |
| Sand bed (1-2 inch shallow) | Optional / personal choice | Optional / personal choice | Optional / personal choice | Not required; add if you want it |
| Protein skimmer | Skip | Later | Essential | Add when nitrates rise above ~10 ppm despite water changes |
| Auto top-off (ATO) | Later | Later | Essential | Add when daily manual topping-off becomes tedious |
| Return pump + sump | Skip | Skip / Later | Essential | Add when upgrading to 75+ gallons or adding a refugium |
| Dosing pump (two-part) | Skip | Skip | Later | Add when water changes alone cannot hold Alk/Ca stable |
| Aquarium controller | Skip | Skip | Later | Useful quality-of-life upgrade, not a safety requirement |
| Calcium reactor | Skip | Skip | Skip (for now) | Relevant only for mature, high-density SPS tanks |
| Chiller | Skip | Skip | Skip | Only if room temp pushes tank above 82°F |
One more thing: the cycling stage
Before any livestock enters the tank, it needs to cycle. This means running the system with live rock and a source of ammonia (a small pinch of fish food, a raw shrimp, or a bottled ammonia product) for 4-6 weeks while the nitrogen cycle establishes. You will see ammonia spike, then nitrite spike, then nitrate appear. Only when ammonia and nitrite read zero and nitrate has appeared can fish and corals safely go in.
This is not optional, and it is not a sign something is wrong. It is how every successful reef starts. There is typically an "ugly stage" afterward, with diatom blooms and possibly cyano or hair algae, that clears up as the system matures. Our how to cycle a reef tank guide walks through the full process, and reef tank setup checklist gives you a step-by-step sequence from empty tank to first livestock.
Frequently asked questions
Can I use distilled water instead of RODI for a reef tank?
Distilled water removes most contaminants and is better than tap water, but a quality RODI unit removes a broader range of dissolved solids and achieves a consistently lower TDS reading. Distilled water from a store is an acceptable short-term substitute for a nano tank if RODI is not available, but for ongoing maintenance RODI is the standard the hobby relies on.
Do I need a sump for a beginner reef tank?
No, not for tanks under about 75 gallons. All-in-one tanks and standard aquariums under 60-75 gallons are frequently kept without a sump using only internal flow, a heater, and an HOB filter or simple media basket. Sumps add water volume, hide equipment, and make running a skimmer much easier, but they add plumbing complexity that beginners can reasonably skip at first.
How much does the equipment for a basic reef tank cost?
A no-frills 20-gallon reef starter setup - tank, light, one wavemaker, heater, basic test kits, rock, salt, and RODI water - typically runs $400-700 depending on which brands you choose. A 40-gallon build with mid-range equipment lands closer to $800-1,200. For a detailed breakdown see our reef tank cost guide.
Is live rock or dry rock better for starting a reef tank?
Both work. Live rock seeds the nitrogen cycle faster (often 1-2 weeks vs. 4-6 weeks for dry rock alone) but can introduce unwanted hitchhikers like aiptasia. Dry rock is pest-free but requires bottled bacteria or a small piece of live rock to kickstart cycling. Most experienced keepers recommend mostly dry rock with a small live rock seed piece, giving you pest control and a head start on the cycle. See live rock vs dry rock for a full comparison.