All-in-one reef tanks explained: what AIO means, how the chambers work, and which system to buy
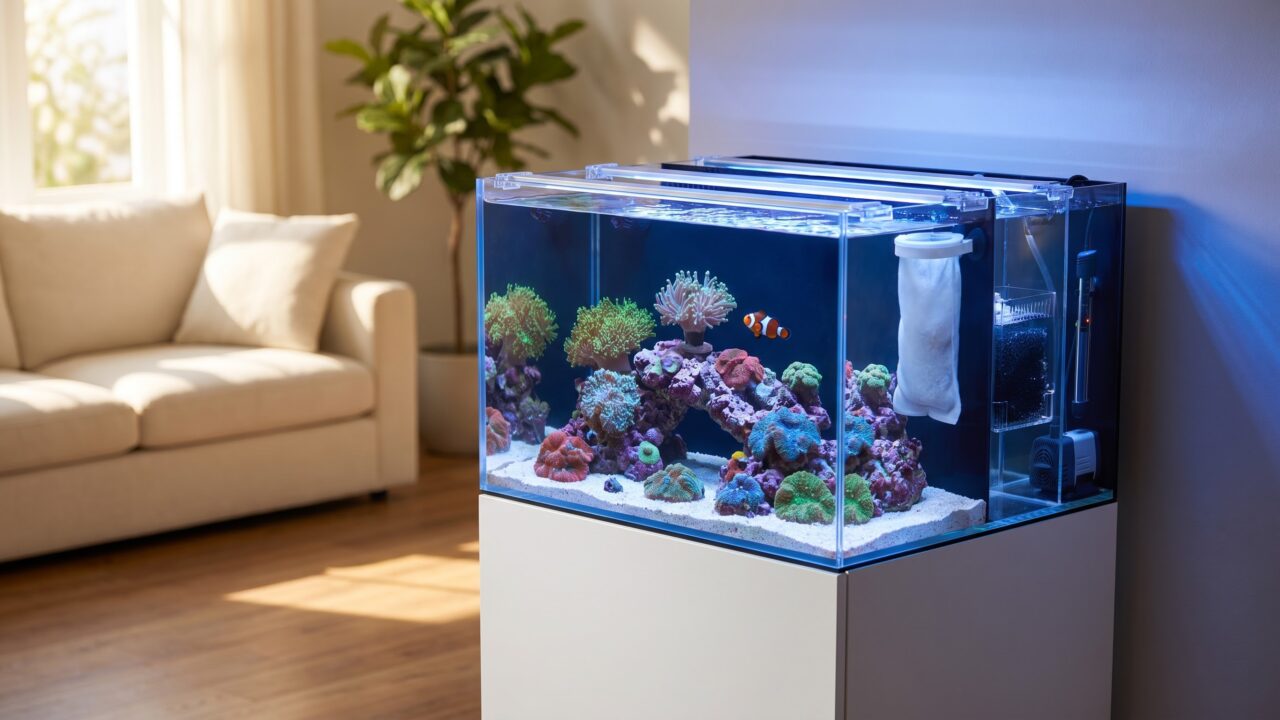
Pick up any beginner's guide to reef tanks and you'll hit the phrase "all-in-one" almost immediately. What it describes is simpler than it sounds: an AIO reef tank is a glass box with a dividing wall cast into the back, turning that rear section into a hidden filtration chamber. There is no sump under the stand, no drilled bulkheads, no plumbing to wrestle with. Water spills over the overflow weir into the back chambers, gets filtered, and a return pump pushes it forward into the display. That's the whole system.
AIO tanks are popular for good reason. But they come with real limitations that matter the moment you want to upgrade equipment or run a serious coral colony. This guide covers both sides clearly, walks through the chamber-by-chamber setup, and gives you a direct spec comparison of the most common AIO lines so you can make an informed choice before buying.
What "all-in-one" actually means
In a conventional reef build, the filtration happens in a separate sump - a second tank hidden in the cabinet below, connected by drilled holes, standpipes, and flexible hose. The display tank and the filter system are physically separate pieces. A sump setup adds considerable water volume, lets you run large skimmers, and gives you room to grow. It also requires plumbing skill and carries some flood risk at every joint.
An AIO eliminates all of that by folding the sump directly into the back of the display tank. A solid acrylic or glass dividing wall creates two or three rear chambers. Water overflows into the first chamber continuously, passes through each subsequent chamber, and returns to the front. Because the water never leaves the tank body, the flood risk from a failed pipe joint drops essentially to zero, according to RateMyFishTank's overview of AIO systems.
The tradeoff is volume and flexibility. That rear dividing wall takes up roughly 10-20% of the total footprint (depending on the model), so a labeled "20-gallon" AIO may hold closer to 16-18 gallons in the actual display. And because the chambers are narrow and fixed, your equipment choices are constrained from day one.
The three chambers and what goes in each one
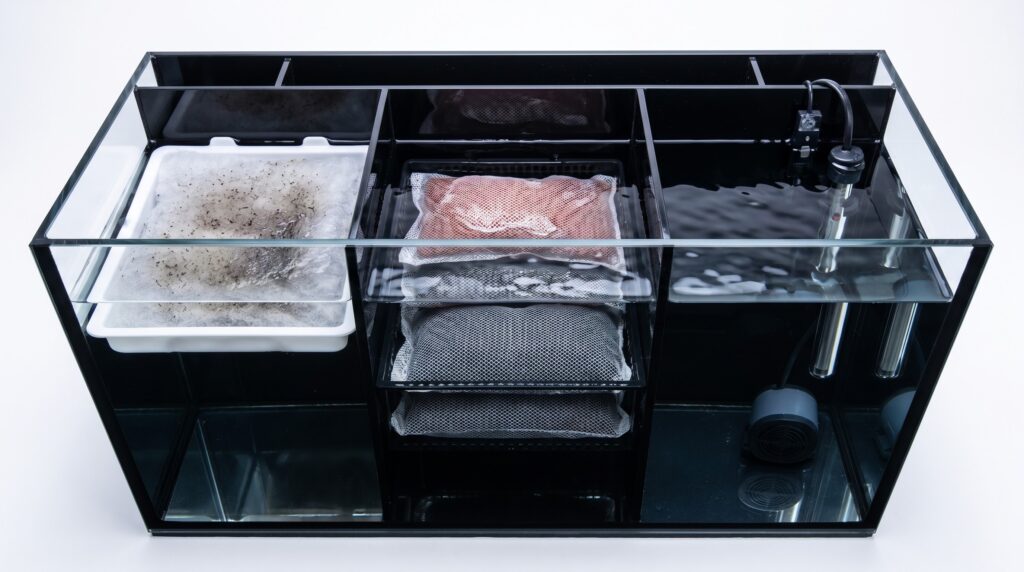
Most AIO tanks use a three-section rear layout. Some manufacturers combine sections or add a fourth, but the logic below applies across almost all of them.
Chamber 1 - mechanical filtration (the intake)
Water enters here first through a surface-skimming overflow slot. This chamber holds your mechanical filter: either a filter sock (usually 200-225 microns on most commercial AIO tanks), a pad of filter floss, or a sponge block. Its job is to catch solid waste before it breaks down into dissolved nutrients. The Red Sea MAX NANO G2 uses a bespoke 225-micron filter sock in this stage; Innovative Marine's Fusion Pro 2 ships with a 200-micron sock plus their CustomCaddy media basket.
This is the chamber you'll service most often. Filter floss should be replaced every 3-5 days to prevent trapped organic matter from decomposing and spiking nitrates. A filter sock can go a week or so before it needs a rinse, but watch it closely in a new tank with active cycling.
Chamber 2 - chemical and biological media
The middle section is where you add your chemical filtration: activated carbon for water clarity and odor control, granular ferric oxide (GFO) if you need to drive down phosphates, and biological media like ceramic rings or plastic biomedia to host nitrifying bacteria. Most manufacturers sell a purpose-built media basket that drops into this chamber. Third-party baskets from brands like InTank are widely available for all the major AIO models and let you stack separate media layers cleanly.
If you plan to run a protein skimmer, it usually lives here too - but read the section on skimmer limitations below first. Not every tank's chamber 2 is wide enough for even a purpose-built nano skimmer.
Chamber 3 - the return pump and heater
This is the deepest chamber in the system and the one with the steadiest water level. Your return pump sits here, pulling water from the sump side and pushing it back into the display through adjustable return nozzles. Place your heater here as well - the consistent flow past the probe gives you accurate temperature readings and even heat distribution. RateMyFishTank's AIO guide specifically recommends the return chamber for heater placement because "the water flow is most consistent" there.
Keep an eye on water level in this chamber. Evaporation drops it first, and a return pump running in air will burn out quickly. An auto top-off system (ATO) with an optical sensor in the return chamber is close to mandatory on any AIO tank, especially a nano. Because "only water evaporates, salt stays behind," even a day or two of unchecked evaporation can push salinity noticeably above 1.025 in a small system.
The real strengths of an AIO setup
For a beginner - or anyone setting up a display tank in a living room without a cabinet to hide equipment - the AIO format solves several problems at once.
- No plumbing. Every AIO tank ships pre-drilled and pre-plumbed. You fill it, plug it in, and the overflow runs by gravity. There are no bulkhead fittings to tighten, no unions to crack, no silicone joints to fail. The flood risk that comes with a drilled sump system drops essentially to zero.
- Matched components. The return pump, overflow slot, and chamber widths are all sized for each other. You're not guessing whether your pump is too powerful for your drain line. On a tank like the Red Sea MAX NANO G2 Cube, the 950 LPH Sicce pump turns over the entire 19.8-gallon system about 10 times per hour - already dialed in at the factory.
- Clean front display. All the equipment lives behind the wall. No hang-on skimmer clipped to the rim, no heater visible in the corner, no cord draped across the glass. The display looks exactly like a rimless aquarium should.
- Space efficiency. You do not need a stand with a cabinet to hide a separate sump. The tank can sit on a bookshelf or a simple open frame, freeing up placement options that a sumped system can't use.
The genuine limitations - and when they matter
The same design that makes AIO tanks beginner-friendly is also what eventually frustrates intermediate reefers who want to grow.
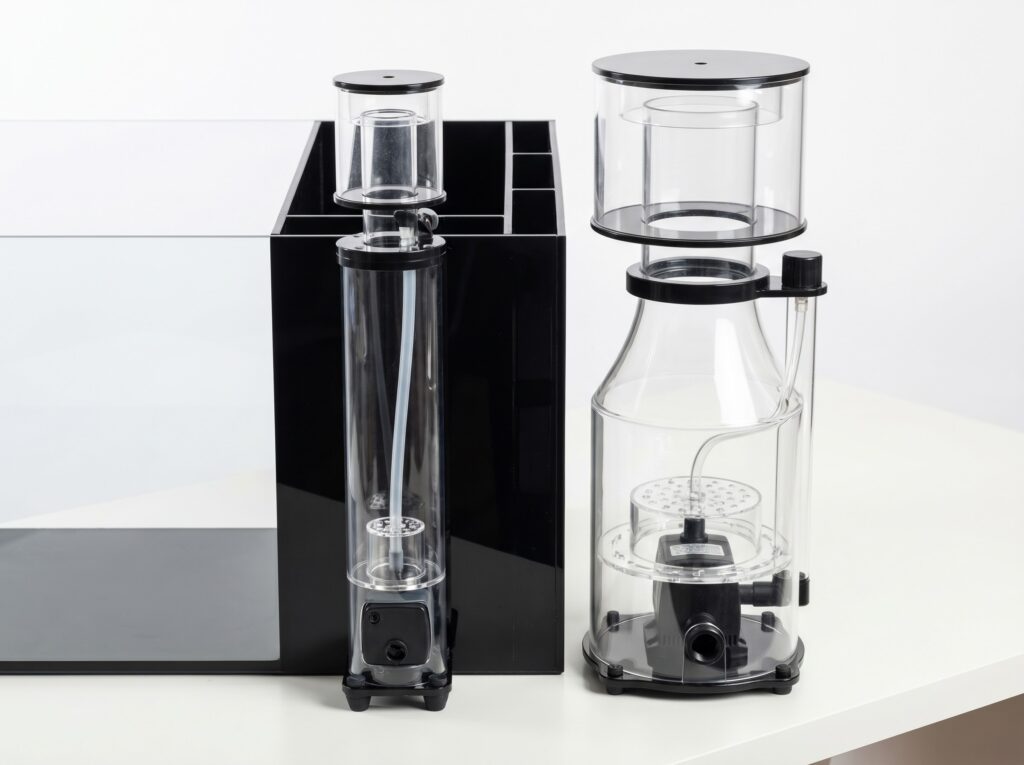
Skimmer constraints are real. A protein skimmer for an AIO rear chamber must fit within a narrow, short space and must not have a collection cup that protrudes awkwardly over the display. The IceCap AIO 240 skimmer - one of the purpose-built options - has a footprint of just 2.75 by 3.625 inches and a total height of 12 inches. It's rated for 20-65 gallons depending on bioload. That is a very different specification from a full-size skimmer you would run in an open sump. If your chamber is too narrow for even a compact skimmer, you are relying entirely on mechanical filtration and water changes to manage dissolved organics.
Proprietary parts and accessory fit. Manufacturers design their accessories specifically for their own chamber widths. Innovative Marine sells AUQA Gadget skimmers, reactors, and wavemakers that are built to fit the Nuvo Fusion chambers. Coralife sells BioCube-specific media cartridges. If the manufacturer discontinues a part, compatible third-party options are not always available. This is a manageable situation for the most popular brands, which have active aftermarket ecosystems - but it is worth thinking about for less common models.
Limited upgrade path. You cannot upgrade to a substantially larger skimmer, add a proper refugium section, or install a calcium reactor without significantly altering the system. As RateMyFishTank notes, "you cannot easily upgrade to a larger filter or add a massive refugium later on." Serious SPS coral keepers or anyone planning to expand bioload over time typically outgrow an AIO and move to a sumped build. For that context, the sump explained guide covers what you gain by making that transition.
Smaller total water volume. The chambers add a modest buffer, but not the 20-30% extra volume a proper sump would add. Less water means faster parameter swings when something goes wrong - a cracked heater, a missed water change, a power outage. For SPS-dominant tanks where alkalinity stability matters enormously, this is a meaningful constraint.
AIO line comparison: specs side by side
The table below compares the most widely available AIO lines in the US market. Specifications are drawn from manufacturer pages and authorized retailer listings. "Display volume" is the usable front section; "total volume" includes the rear chambers. Return pump GPH figures are the manufacturer's rated flow at zero head - actual flow through the chambers will be somewhat lower.
| Brand / model | Display vol. | Total vol. | Footprint (LxW) | Return pump (rated) | Skimmer included? | Light included? | Best for |
|---|---|---|---|---|---|---|---|
| Red Sea MAX NANO G2 Cube | 16.4 gal (62 L) | 19.8 gal (75 L) | 17.7" × 17.7" | 950 LPH Sicce (~250 GPH) | Yes - built-in MAX skimmer | Yes - ReefLED G2 60 | Plug-and-play reef; soft corals to LPS; includes ATO |
| Red Sea MAX NANO G2 XL | 29.3 gal (111 L) | 33 gal (125 L) | 19.7" × 23.6" | 1550 LPH Sicce (~410 GPH) | Yes | Yes - ReefLED G2 60 | Mixed reef; more coral real estate |
| Innovative Marine Nuvo Fusion Pro 2 - 10 | ~8 gal | 10 gal | 11.8" × 15" | 326 GPH DC (rated) | No - add separately | No | Nano reef; desktop; budget entry |
| Innovative Marine Nuvo Fusion Pro 2 - 20 | ~16 gal | 20 gal | 23.6" × 15" | ~211-326 GPH DC | No - AUQA Gadget skimmer sold separately | No | Nano to small reef; high aftermarket support |
| Coralife BioCube 16 | ~13 gal | 16 gal | 15" × 16.75" | 185 GPH | No | Yes - integrated LED hood | Beginner nano; low initial cost |
| Coralife BioCube 32 | ~26 gal | 32 gal | 20.25" × 21.875" | 264 GPH | No | Yes - integrated LED hood (PAR 53 @ 12") | Soft corals; beginner to intermediate |
| Fluval EVO 13.5 | ~11 gal | 13.5 gal | 22" × 15" | 132 GPH | No | Yes - 16W integrated LED | Budget entry; peninsula footprint |
| Waterbox AIO 10 Cube | 10.5 gal (40 L) | ~12 gal est. | 13.8" × 13.8" | 80 GPH (300 LPH) | No | No | Ultra-nano; ultra-clear glass; light sold separately |
| Waterbox AIO 20 Cube | 20 gal (76 L) | ~23 gal est. | 17.7" × 17.7" | Included (GPH not published) | No | No | Premium glass; flexible media options |
A few judgment calls worth stating plainly:
- The Red Sea MAX NANO G2 is the only common AIO line that ships with a rated protein skimmer and an ATO unit at the same time. For a beginner who wants to unbox and run a clean reef, that full-kit approach reduces the number of early decisions considerably.
- Innovative Marine's AUQA Gadget ecosystem makes the Nuvo Fusion the most customizable bare-tank AIO on the market. If you want to choose your own light and potentially upgrade the skimmer later, the Fusion Pro 2 is the better starting chassis.
- The Fluval EVO 13.5 remains the easiest entry point by price, though its 132 GPH stock pump is underpowered for a reef bioload and is frequently replaced with an Eheim compactON 1000 (106-264 GPH adjustable) by experienced users.
- Waterbox's ultra-clear low-iron glass is genuinely superior visually, but buying a Waterbox AIO means budgeting separately for a light from day one.
How chamber size constrains your skimmer options
This deserves its own section because it trips up more beginners than almost anything else in the AIO format.
A protein skimmer needs a minimum water depth to operate correctly - check the current product page for the exact requirement on each model - and must fit within the chamber width without touching the walls, which would dampen vibration and affect performance. Purpose-built AIO skimmers like the IceCap AIO series (2.75" × 3.625" footprint, 12" tall) and Innovative Marine's own AUQA Gadget SkimMate are designed for exactly this constraint. But they are rated for lighter bioloads than an equivalently priced sump skimmer would handle.
On the smallest AIO tanks - anything under 15 gallons - the chambers are often too narrow for even a compact in-sump skimmer. In that size range, you are generally managing nutrients through aggressive mechanical filtration (clean your floss constantly), activated carbon, GFO, and frequent small water changes rather than protein skimming. For nano tanks that will house soft corals and a clownfish pair, that is manageable. For anything with a heavier bioload or SPS goals, it is a real limitation.
Setting up the chambers correctly
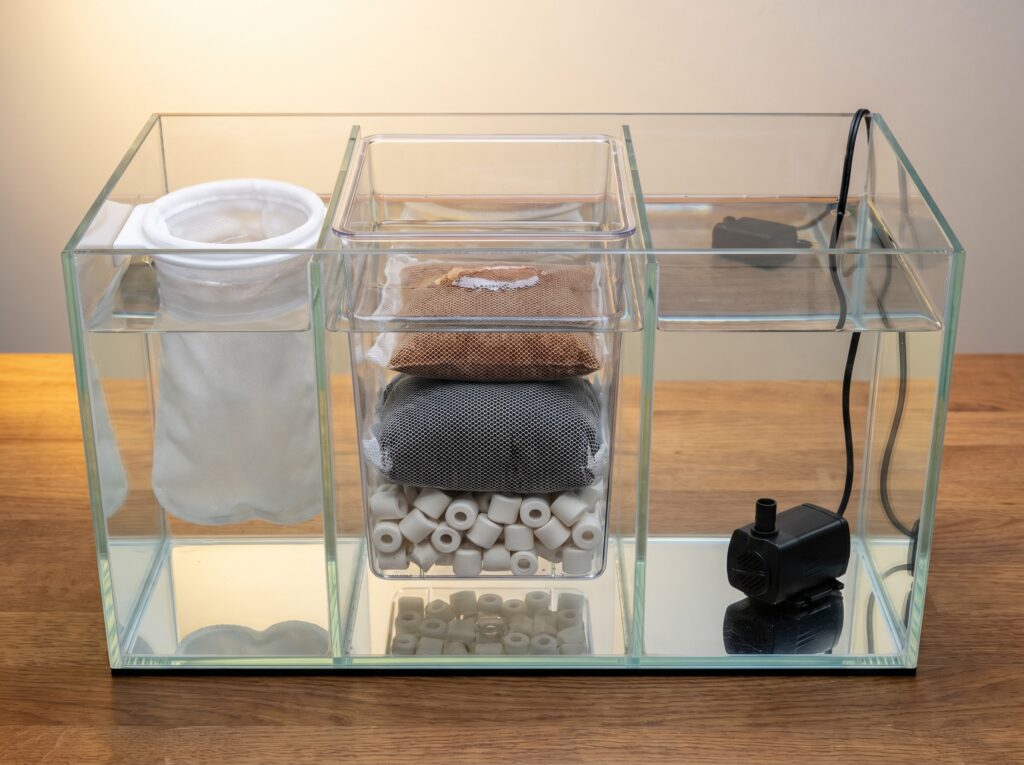
The order of operations below applies to virtually every three-chamber AIO layout. Your tank's manual will show exactly where each section starts and ends.
- Chamber 1 - drop in your mechanical filter first. If the tank ships with a filter sock, seat it so it seals the overflow slot completely. If you are using filter floss, cut it to fit the full width of the intake. Any gap lets particles bypass filtration and reach the media.
- Chamber 2 - load media in separate layers, not mixed. If your tank shipped with a media basket, place biological media (ceramic rings, plastic biomedia) at the bottom, carbon in the middle, and GFO in a separate mesh bag on top if you need it. Layering keeps each medium performing its specific job. Add a nano skimmer here if chamber width allows.
- Chamber 3 - install the return pump and heater. Seat the pump at the bottom of the chamber. Route the heater vertically alongside it so the probe is fully submerged in moving water. Set your ATO sensor at the target water level before you start adding salt - it is far easier to calibrate on a dry run than after the system is live.
- Fill slowly and check for overflow. Fill through the display, not the chambers. Watch the water level in chamber 3 as it equalizes - it should settle a few inches below the top of the dividing wall. If chamber 3 is too low, the return pump will draw air. Most AIO tanks ship with adjustable water-level risers (standpipes) that let you raise the water height in chamber 3.
From there, you are running a standard nitrogen cycle like any other reef tank. The AIO format changes nothing about cycling; ammonia still rises, nitrite follows, and nitrate is the endpoint before adding livestock.
Sizing an AIO for your situation
If you are choosing your first reef tank, the beginner tank guide covers the full decision, but here is the practical summary for AIO specifically: go larger than you think you need. A 20-gallon AIO will give you more stability, more livestock options, and more margin for error than a 10-gallon, and the monthly operating costs are not dramatically different. The 16-26 gallon display class - which maps to the Red Sea MAX NANO G2 Cube (16.4 gal display), the Innovative Marine Fusion Pro 2 20 (~16 gal display), or the Coralife BioCube 32 (~26 gal display) - is where most experienced hobbyists point beginners.
For context on how AIO tanks compare to other entry formats, the tank sizes overview lays out the full range from pico tanks to 40-gallon breeders. The nano reef build guide digs into the specific equipment decisions for sub-20-gallon setups where AIO is the dominant format.
Frequently asked questions
Can I run SPS corals in an AIO reef tank?
Yes, but it requires careful management. AIO tanks can host acropora and other SPS corals if you maintain stable alkalinity (8-11 dKH), calcium (400-450 ppm), and temperature, and if you add a quality AIO-compatible skimmer plus consistent water changes. The limited water volume means parameter swings happen faster, so a dosing pump or two-part system becomes important earlier than it would in a larger sumped build.
Do I need a separate protein skimmer for an AIO tank?
It depends on your bioload. A lightly stocked soft-coral tank with a small cleanup crew can often run without a skimmer if you change water regularly and stay on top of your mechanical filter. Add a fish or two, and a purpose-built AIO skimmer becomes worthwhile. The Red Sea MAX NANO G2 includes a rated skimmer at purchase; other brands require buying one separately.
How often do I need to clean the rear chambers?
Chamber 1's filter floss needs replacing every 3-5 days; a filter sock can go up to a week between rinses. The media in chamber 2 depends on what you are running - carbon lasts 4-6 weeks, GFO until it exhausts (test phosphate to track it). Give the return pump impeller a thorough clean every 3-4 months to clear calcium and debris buildup, which reduces flow over time. A monthly wipe-down of the chamber walls prevents salt creep and algae patches from taking hold.
What is the difference between an AIO tank and a nano tank?
"Nano reef" refers to small volume - generally under 30 gallons. "AIO" refers to the filtration format. They overlap heavily because AIO tanks are almost always small, but a 10-gallon tank with a separate hang-on filter is a nano tank that is not AIO, and some AIO tanks (like the Waterbox AIO 50.3) are not really nano tanks by volume. Most beginner AIO tanks are both.