Dinoflagellates in a reef tank: how to identify them and actually beat them
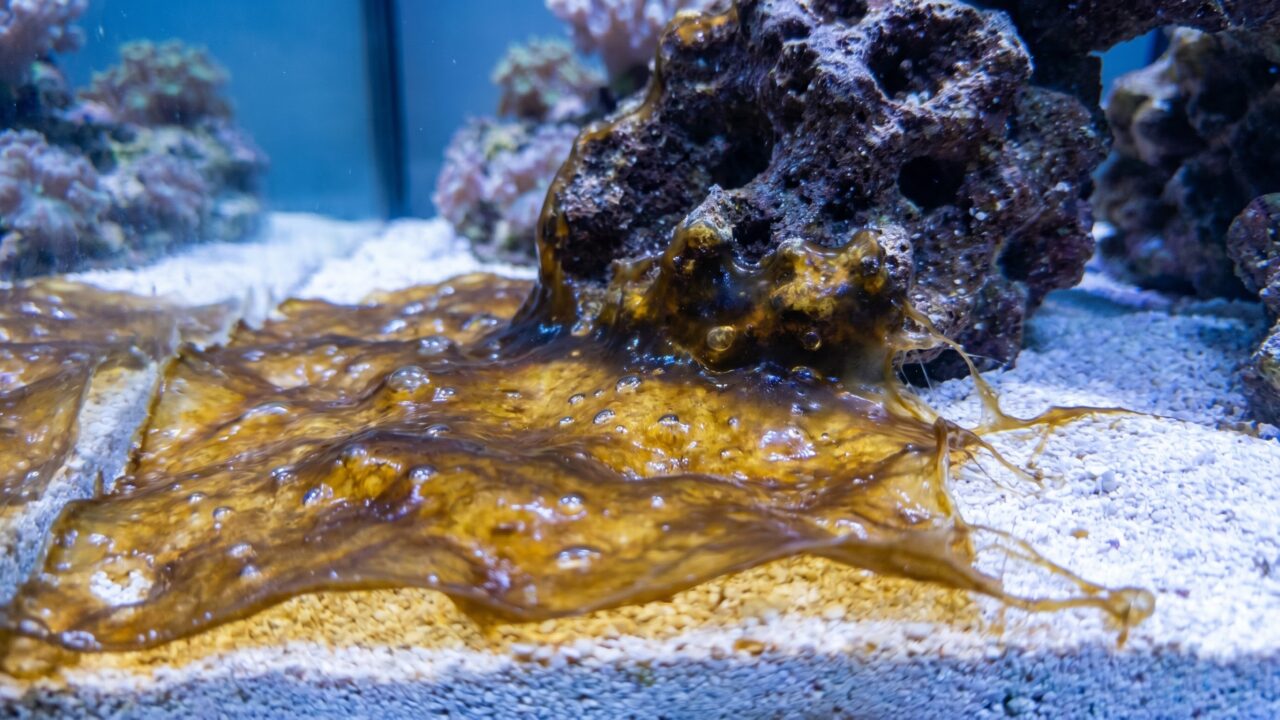
If you have snotty brown strings coated in tiny bubbles spreading across your sandbed by late afternoon, you are probably looking at dinoflagellates. They are among the more frustrating pest outbreaks in reef keeping, partly because the usual fix feels backwards: the tanks most likely to crash with dinos are the ones with the cleanest water. Counterintuitively, raising your nitrate and phosphate is often part of the cure.
The multi-pronged approach laid out below covers identification, the nutrient paradox, UV sterilization, blackout protocol, biodiversity, and manual export. There is also a decision tree at the end to help you confirm you are actually dealing with dinos before you start treating the wrong thing.
What dinoflagellates look like in a tank
Dinoflagellates are single-celled organisms, each equipped with two flagella that make them spin as they swim. Most species you will encounter in a reef tank are photosynthetic, which explains the one feature that sets them apart from other nuisance algae: they follow the light. Cells migrate upward during the day, accumulate at the surface and on rock and sand by late afternoon, then retreat at night when photosynthesis stops. According to research published through MarineBio Conservation Society, this diel vertical migration is a defining biological behavior of the group.
In a tank, that behavior shows up as brown or golden-brown film and strings that look significantly worse right before lights-out, then seem to partially disappear overnight. Freshwater aquarists almost never see this disappearing act; it is a strong signal you are dealing with something photosynthetic and motile.
The classic visual cues for dinoflagellates specifically (not diatoms, not cyanobacteria):
- Slimy, mucus-like texture - the strings are cohesive, not dusty
- Gas bubbles trapped in the mat, often visible from outside the glass
- Golden-brown to dark brown color; occasionally orange-brown
- Worst at the end of the photoperiod; visibly reduced by morning
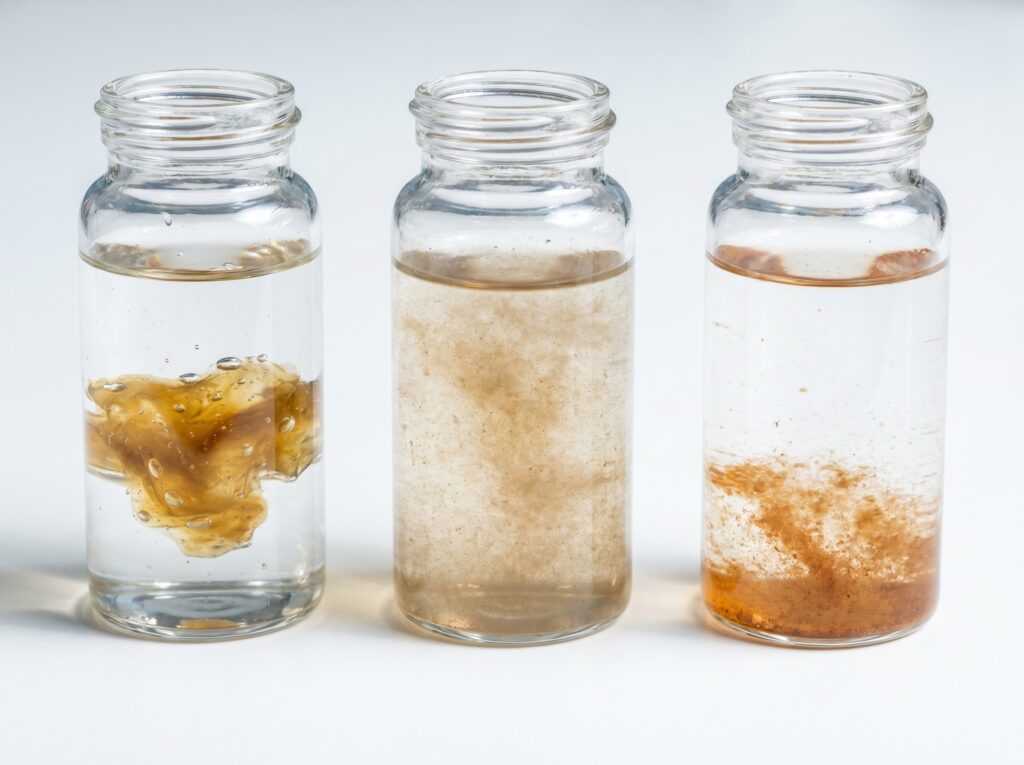
- Strings can be lifted off as a sheet and will reform into a snotty clump when disturbed in a cup of tank water
Diatoms, by comparison, look like a light brown dust you can blow off rock with a turkey baster. They do not form sheets, they do not trap bubbles, and they generally vanish on their own as a tank matures. Cyanobacteria form flat red or purple films with a faint musty smell and stay put at night. If you need a detailed comparison, our article on diatoms vs. dinoflagellates vs. cyano walks through the differences with a side-by-side breakdown.
The three species you are most likely dealing with
Hundreds of dinoflagellate species exist, but three genera account for nearly all of the outbreaks hobbyists encounter.
| Genus | Appearance in tank | Where it settles | Toxicity concern |
|---|---|---|---|
| Ostreopsis | Heavy, slimy golden-brown mats; most pronounced bubbling | Rock, coral skeletons, sandbed edges | HIGH - produces palytoxin-like ovatoxins |
| Amphidinium | Thinner, faster-spreading film; smaller cells | Primarily sandbed; rocks stay cleaner | Moderate - produces haemolytic compounds |
| Prorocentrum | Light brown film, less slimy, often mixed with diatoms | Sand and rock surfaces evenly | Moderate - produces okadaic acid (DSP toxin in wild fisheries) |
Ostreopsis is the one that warrants the most caution during manual removal. Research published in Frontiers in Marine Science confirms it produces a family of palytoxin-like compounds called ovatoxins. The same palytoxin family is found in Palythoa zoanthids (those zoanthid colonies many reefers keep); a documented case published in PMC describes an aquarist who aerosolized palytoxin by cleaning zoanthids with hot water and required seven days of hospitalization, after which he required supplemental oxygen for a further month before making a full recovery. You do not need to handle either dino mats or zoanthids without gloves and ideally eye protection, and you should never boil, bleach, or pour hot water on them.
Why ultra-low nutrients cause dinoflagellate outbreaks
This is the piece most newcomers miss. Dinos are not a sign of a dirty tank. They tend to appear in tanks that are almost too clean.
Dinoflagellates are mixotrophic, meaning they can photosynthesize AND consume organic particles when inorganic nutrients run out. When your nitrate reads 0 and your phosphate reads undetectable, beneficial microalgae, bacteria, and coralline cannot compete - they need those nutrients to grow. Dinos, with their ability to scavenge, keep going. Research on phosphate starvation in Symbiodinium (the dinoflagellates that live inside corals) published in PMC showed that corals under extreme phosphate limitation suffer PSII damage, bleach, and expel their symbiont algae - which is directly parallel to what happens to a tank's microbial ecology when nutrients crash to zero.
Healthy reef chemistry is not zero nutrients. The SteadyReef target parameters are nitrate 1-10 ppm and phosphate 0.03-0.10 ppm. Tanks running below those targets routinely report dino problems. The fix is often deliberate and feels wrong: you need to raise nutrients. Our guide on how to raise nitrates and phosphates covers the safest methods (target nitrate 5-10 ppm and phosphate around 0.05-0.08 ppm as a starting point). Raise slowly and retest every few days. Going from zero to 20 ppm overnight is not the goal.
This also means checking your skimmer aggressiveness, your activated carbon change frequency, and whether you are running a large zeolite or carbon-dosing system that is stripping nutrients beyond the useful range.
The multi-pronged treatment protocol
No single action reliably beats dinoflagellates. What works is running several interventions at once and sustaining them for at least two to four weeks. Below is the protocol, ordered by the sequence most hobbyists follow.
Step 1 - Manual export
Start by physically removing as much biomass as possible before doing anything else. Use a turkey baster or a siphon hose to pull the mats off rock and sand each morning (dino populations are lower in the morning, making this slightly easier). Do this every day during treatment. You are not solving the outbreak this way, but you are reducing the photosynthetic load and slowing the reproduction cycle while the other interventions take hold.
Wear nitrile gloves and wash your hands after. Dispose of the removed water rather than pouring it back in.
Step 2 - Raise nutrients to the target range
Test nitrate and phosphate. If either reads below the healthy floor, dose to correct it. Use food-grade sodium nitrate for nitrate and monosodium phosphate for phosphate if dosing directly, or simply increase feeding and reduce skimming aggressiveness. The goal is stable nitrate around 5-10 ppm and phosphate around 0.05-0.08 ppm - enough to support beneficial microbes and coralline without fueling macroalgae problems.
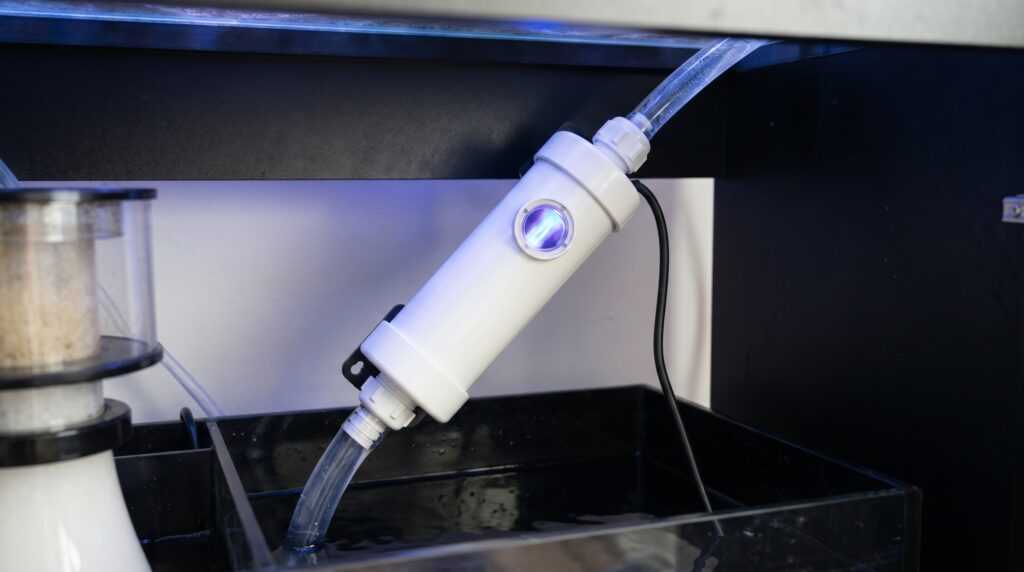
Step 3 - Add a UV sterilizer
UV sterilization works by exposing free-swimming dinoflagellate cells to UV light - typically around 254 nm (the primary germicidal wavelength), within the broader 250-280 nm UVC range - as water passes through the unit. Studies on UV disinfection indicate doses of roughly 20-34 milliwatt-seconds per cm² inactivate approximately 99% of susceptible organisms. Benthic (mat-forming) cells that are attached to surfaces are not exposed, so UV alone is not a complete fix. But it significantly cuts the free-swimming population that reseeds the tank each morning, reducing the rate at which mats recover after manual removal.
Size the UV sterilizer to turn over your display volume roughly once per hour. Slower flow through the unit means longer contact time and better kill rates. For more detail on choosing and sizing a unit, see our guide on UV sterilizers for reef tanks.
One practical note: Amphidinium stays largely benthic and does not pass through the water column as readily as Ostreopsis, so UV has a more limited effect on that genus. The other two steps matter more in that case.
Step 4 - Blackout (optional but effective for heavy outbreaks)
A full blackout - completely blocking light from the tank for three to five days - starves photosynthetic dinos of their energy source. Corals tolerate a three- to five-day blackout better than they tolerate an extended dino bloom, so the trade-off is generally worth it in heavy outbreaks. Keep the return pump and circulation running; water flow and oxygen exchange matter during a blackout. Many hobbyists skip feeding during the blackout period to avoid adding extra nutrients that dinos may use heterotrophically, though light feeding will not negate the protocol if you have fish that need it. After lights come back on, ramp the photoperiod back up over a week to avoid shocking corals.
Blackout is most effective on Ostreopsis and least effective on strains that have a stronger heterotrophic (non-photosynthetic) feeding mode. If the dinos return quickly after a blackout, you have a nutrient and/or biodiversity problem still to address.
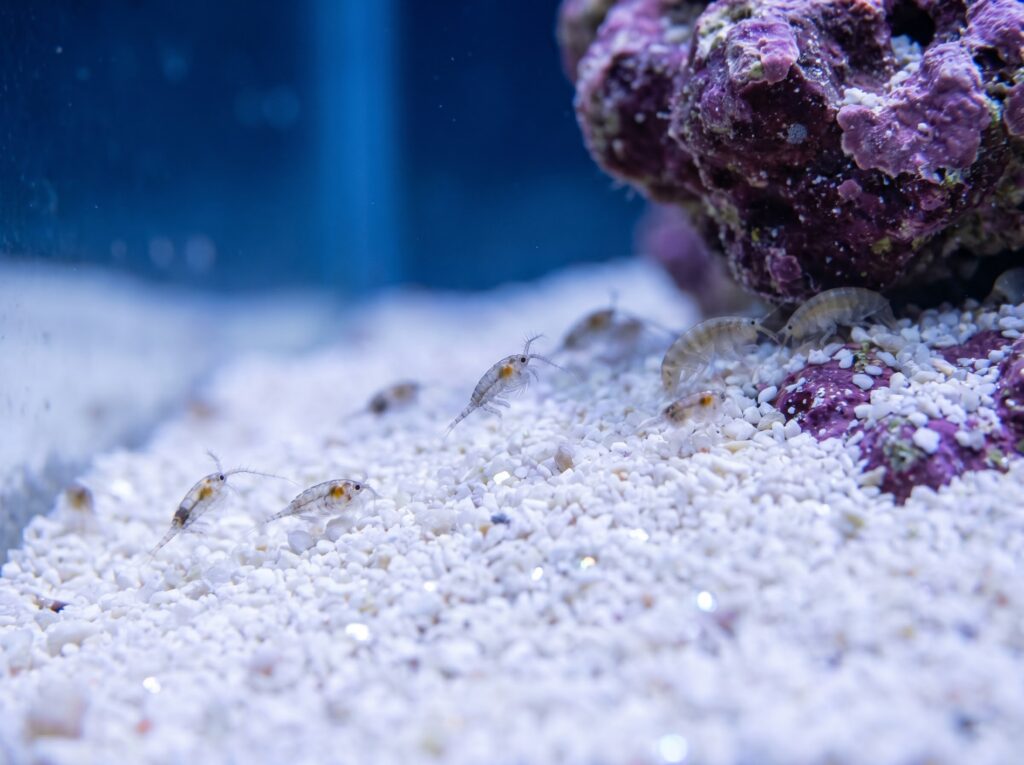
Step 5 - Build biodiversity
A microbially diverse tank is a dino-resistant tank. Adding copepods helps on two fronts: they graze on microalgae films (including dino mats), and their presence indicates a healthy, complex food web that dinos struggle to dominate. Tisbe is a strongly benthic grazer that actively works dino films on sand and rock surfaces. Tigriopus is primarily a water-column species and more useful as a food source for fish and corals than as a benthic film grazer, but both contribute to a healthier, more complex food web. Add a meaningful quantity (a few hundred at minimum for most display tanks) and provide a refugium or protected area so they can reproduce. Our article on copepods in a reef tank covers setup and sourcing in detail.
Beyond copepods, herbivorous snails (cerith, nassarius, and nerite species) help keep substrate surfaces less hospitable for dino attachment. A sandbed with active infauna churns the surface and disrupts the stable film dinos need to establish.
The SteadyReef 5-Step Dino Protocol - at a glance
For quick reference and sharing, here is the complete SteadyReef protocol condensed into a numbered checklist. Run all five steps concurrently for at least two to four weeks.
- Export daily. Siphon or turkey-baste dino mats every morning before lights reach peak intensity. Discard the removed water - do not return it to the tank. Wear gloves.
- Correct nutrients. Test nitrate and phosphate. If nitrate is below 1 ppm or phosphate is undetectable, dose or feed up to nitrate 5-10 ppm and phosphate 0.05-0.08 ppm. Reduce skimmer aggressiveness. Retest every two to three days.
- Add UV sterilization. Size for approximately one tank volume per hour of flow. Run continuously throughout treatment - do not turn it off when mats thin out. UV targets free-swimming cells that would otherwise reseed the tank each morning.
- Blackout if heavy. For severe outbreaks, block all light for three to five days. Keep circulation and return pump running. Resume with a gradual ramp-up over one week after the blackout ends.
- Build biodiversity. Add a meaningful dose of copepods (at least a few hundred for most display tanks), focusing on Tisbe for benthic grazing. Add cerith and nerite snails. Establish or improve a refugium so the population sustains itself.
Outbreaks that relapse after this protocol almost always trace back to one of three root causes: nutrients drifted back to near-zero, the UV was turned off too early, or the biodiversity addition was too small to self-sustain. Address the root cause, not just the symptom.
Dinos vs. everything else: a decision tree
Before treating for dinoflagellates, confirm you are actually dealing with them. Treating cyano with a blackout makes it temporarily better. Treating diatoms with nutrient raising is wasteful and can cause a separate problem. Use this decision tree to narrow down what you have.
| Observation | Dinos | Diatoms | Cyanobacteria |
|---|---|---|---|
| Color | Golden-brown to dark brown | Light rust-brown | Maroon, red, or blue-green |
| Texture | Slimy, cohesive sheets | Dusty, grainy film | Flat, slick film; slightly bubbly in some species |
| Gas bubbles visible? | Yes - a strong indicator | No | Sometimes (cyano can also produce gas) |
| Worse at end of day? | Yes - peaks before lights-out | No clear pattern | No clear daily cycle |
| Partially gone by morning? | Yes - cells migrate downward | No - stays put | No - stays put |
| Distinctive smell? | Mild or none | None | Yes - musty or sulfurous |
| Shake test (sample in cup) | Reforms into snotty clump after shaking | Disperses like fine sand | Stays suspended, does not clump |
| Tank age | Any age; common in mature, over-filtered tanks | New tanks, first 4-8 weeks | Any age; often after high organic load |
| Nutrients at time of outbreak | Often ultra-low (nitrate near 0) | Typically elevated silica | Often elevated organic/nitrate |
| Primary fix | Raise nutrients + UV + biodiversity | Wait; add CUC; diatoms self-resolve | Increase flow; reduce organics; Chemiclean if needed |
If the shake test produces a snotty clump and you see gas bubbles worst at late afternoon, you almost certainly have dinos. If you are still unsure, look at a water sample under a 40x or higher microscope: dinoflagellate cells are visibly spinning and often show two grooves (the cingulum) around the middle of the cell.
A note on toxicity and handling safety
Not all dinoflagellates you will encounter are dangerous to handle, but some of the genera above produce toxins that are serious. Ostreopsis species produce ovatoxins, which belong to the same palytoxin family as the compounds found in Palythoa zoanthid corals. PMC-published research confirmed that commercially sold zoanthids can contain 500-3,500 micrograms of palytoxin per gram of wet tissue - potent enough that the researchers calculated their combined samples could kill 300,000 mice. Palytoxin's LD50 ranges from 0.025 to 0.9 micrograms per kilogram (across different animal species, by intravenous injection - for example, 0.025 in rabbits, 0.45 in mice, and 0.9 in guinea pigs), making it one of the most potent naturally occurring toxins known.
Practical rules:
- Wear gloves any time you have your hands in a tank with an active dino bloom or zoanthid colonies
- Do not perform manual dino removal in a poorly ventilated space
- Never boil, microwave, or pour boiling water on anything removed from a reef tank
- If you experience chest tightness, coughing, or difficulty breathing after tank work, seek medical attention and tell the physician you were working with marine tank organisms - palytoxin inhalation requires supportive respiratory treatment
- Keep children and pets away from tank water during active dino removal sessions
These precautions are not meant to alarm you - the vast majority of hobbyists work with reef tanks for years without incident. They are just good practice, especially during outbreak management when you are physically disturbing mats.
What to expect during recovery
Run the full protocol - daily manual removal, corrected nutrients, UV, biodiversity addition - for at least three to four weeks before evaluating results. Dino outbreaks rarely crash in a week. The typical pattern is that mats thin out progressively, requiring less and less removal each morning, then one day you realize you have not seen them in a few days.
Tanks that relapse are almost always ones where nutrients drifted back to near-zero, where the UV was turned off too soon, or where the biodiversity addition was too small to establish a self-sustaining grazer population. Stability is the goal, not a single dramatic intervention.
Salinity should remain at 1.025 (35 ppt), temperature stable at 76-78F, and alkalinity stable in the 8-11 dKH range throughout treatment. Swinging parameters during a pest outbreak adds stress to corals that are already competing with the dino mats for light and nutrients.
Frequently asked questions
Can dinoflagellates kill corals?
A heavy, prolonged dino bloom can stress corals significantly by blocking light and competing for nutrients. LPS and softies are more tolerant than SPS. The greater coral risk from some dino species (particularly Ostreopsis) is toxin production, which at high concentrations can directly harm soft tissue. Controlling the bloom promptly is the priority.
How long does a dino outbreak typically last without treatment?
Untreated, outbreaks can persist for months if the underlying nutrient and biodiversity conditions that triggered them are not corrected. Some tanks cycle through dinos as part of the new-tank ugly stage and resolve on their own within six to eight weeks, but established tanks with ultra-low nutrients usually do not self-resolve.
Will hydrogen peroxide dosing kill dinoflagellates?
Some hobbyists use targeted hydrogen peroxide dips or spot treatments on dino mats. Results are inconsistent, and overdosing risks tissue damage to corals and harm to invertebrates. We do not recommend peroxide as a first-line treatment given the risk-to-benefit ratio; the nutrient-correction and biodiversity approach is safer and addresses root causes.
Do cleaner shrimp or hermit crabs help with dinos?
Not meaningfully. Most cleaner shrimp and hermit crabs do not graze on dino mats. Copepods and specific herbivorous snails (particularly cerith and nerite species) are more useful for keeping substrate surfaces less hospitable. Focus on the full protocol rather than expecting a single cleanup crew addition to solve it.